

Crochet Heart Trinket Dish: The No-Magic-Ring Version That Sits Flat and Stands Up
There should be a small dish beside your bed. Instead the earrings live on the windowsill, the rings live in a mug in the kitchen, and every morning you do the same three-second search before you leave the house.
You have probably looked at patterns for one, and most open with a magic ring. If you have ever pulled one closed, felt pleased with yourself, then watched the centre quietly work itself loose a week later, you know why beginners stop on round one.
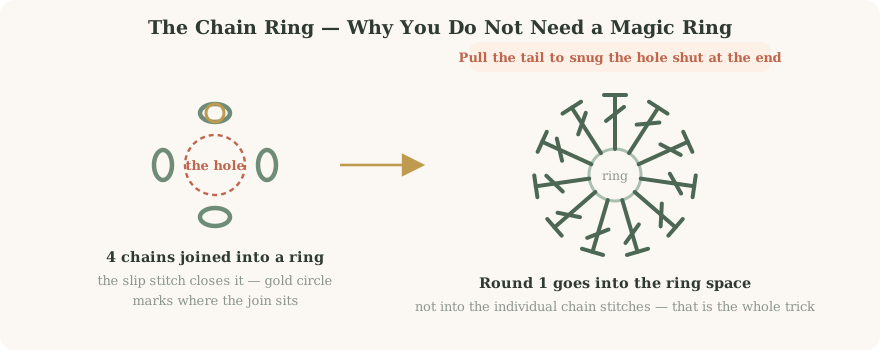
This crochet heart trinket dish skips it. Four chains joined into a ring, and the part that stops people is already behind you.
By the end of an evening you have a small heart with a flat bottom, a wall that holds itself upright without stiffening spray, and enough weight that it stays put when you drop a ring into it.
What Is a Crochet Heart Trinket Dish?
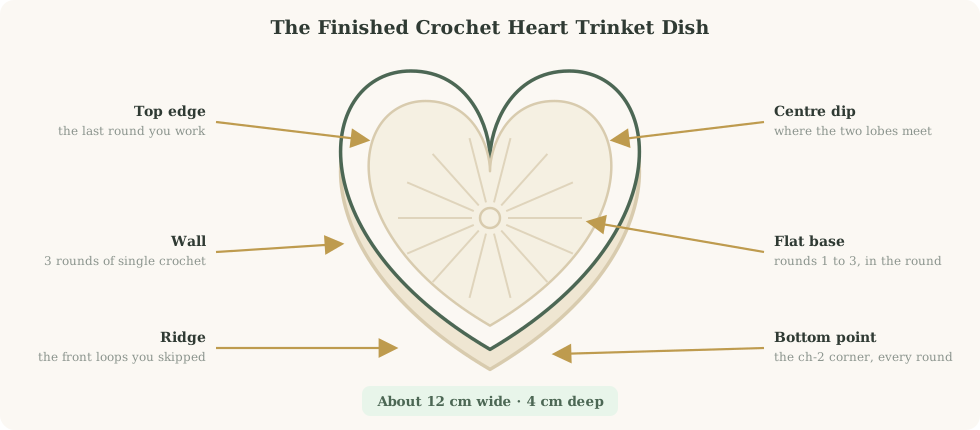
A crochet heart trinket dish is a small heart-shaped bowl worked in joined rounds from a single centre ring. Three rounds build a flat heart base. Three short rounds into the back loops only then force the fabric to hinge upward into a wall. Finished, it measures roughly 12 cm across and 4 cm deep.
No panels, no seaming, no lining. The heart is not appliqued on afterwards either — it comes out of the stitch heights on round one.
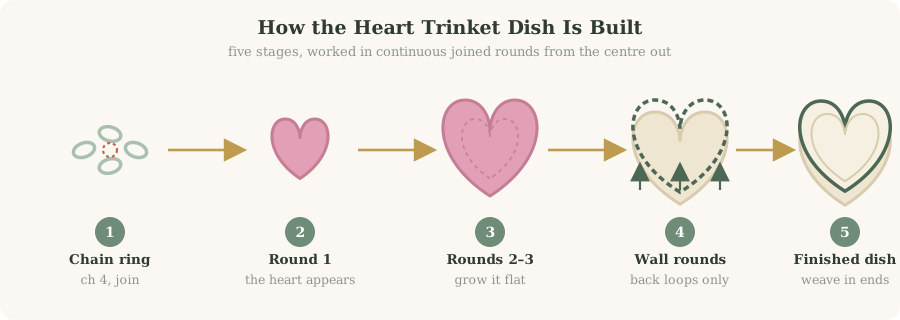
What the finished dish is made of
- A chain ring at the centre — four chains and a slip stitch
- A flat base of three rounds, worked into both loops
- A ridge where the base ends and the wall begins
- Three wall rounds of single crochet, short and firm
- A centre dip and a bottom point, the two features that stop it reading as a circle
Why this suits a beginner
The project is small, so a mistake costs fifteen minutes rather than a weekend. One hook, one ball, nothing worked in rows.
It also teaches two things you will reuse constantly: starting a round without a magic ring, and working into the back loop only to create a fold. Baskets, buckets and hats all rely on that second one. If you have made a flat piece like our basic crochet hairband, this is the natural next step.
What You Need
Four things, and you probably own three of them.
| Item | What to use | Why it matters |
|---|---|---|
| Yarn | Worsted weight (4), about 40 m / 45 yd | Enough body to hold a wall up. Thinner yarn goes floppy. |
| Hook | 5 mm | Tighter than most worsted ball bands suggest, deliberately. |
| Scissors | Any sharp pair | Blunt ones leave a tail that will not thread. |
| Tapestry needle | Blunt, large eye | A sharp needle splits the yarn and shows. |
| Stitch marker | Optional | Mark the bottom point so you keep your place. |
Swipe the table sideways to see every column.
Choosing the yarn
Fibre changes the result more than colour does. Cotton gives a crisp edge and a wall that stays where you put it. Acrylic is softer and forgiving of uneven tension, but relaxes over the first week. Wool blends sit between the two.
Whatever you pick, check the ball band against the Craft Yarn Council weight system rather than the word on the label. Aran, worsted and 10-ply all land in category 4, but brands stretch it.
Stitches and Abbreviations
Everything below is in US terms. You already know most of them.
| Abbreviation | Stitch | Where it is used |
|---|---|---|
| ch | chain | The starting ring, and the corner at the point |
| sl st | slip stitch | Closing the ring, joining every round |
| sc | single crochet | All three wall rounds |
| dc | double crochet | The base, and the top of each lobe |
| tr | treble crochet | The outer curve of each lobe, round 1 |
| dtr | double treble | The bottom point, round 1 only |
| BLO | back loop only | Round 4, the round that makes the wall |
Swipe the table sideways to see every column.
The one technique that is new
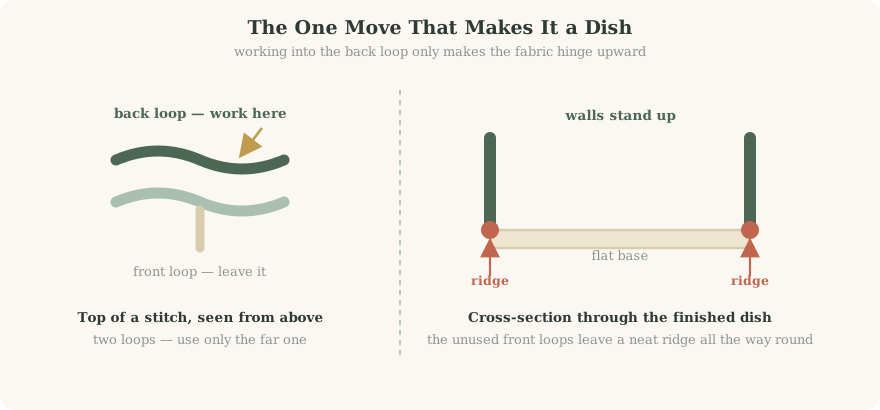
Back loop only. Every stitch top is a small V of two strands. Work into the far strand, leave the near one alone, and the fabric folds along the line of abandoned loops. That fold is your wall, and the skipped front loops become the ridge running round the outside.
It feels wrong the first time. You are using half the stitch and the hook wants both. Slow down for one round.
How Big Should Yours Be?
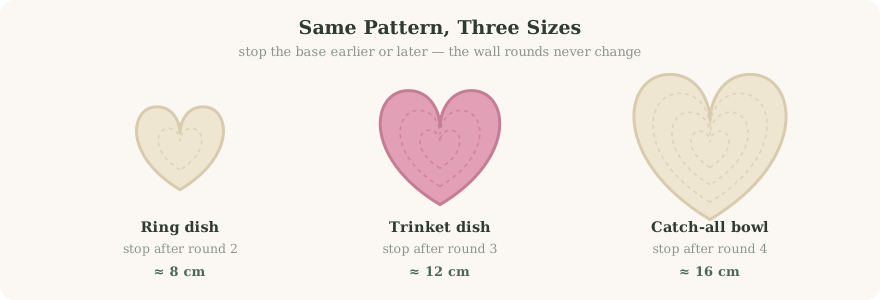
Gauge on a piece this small is a suggestion. Hook grip, yarn and mood each shift the finished width by a centimetre. Measure rather than count.
- Lay the base flat after round 3. Do not stretch it.
- Measure lobe to lobe across the widest part.
- Measure top to bottom, centre dip down to the point.
- Compare against the table and decide whether to add a base round before the wall.
- Measure the depth from ridge to top edge afterwards. Three rounds of sc gives roughly 4 cm.
| Size | Base rounds | Width | Depth | What it holds |
|---|---|---|---|---|
| Ring dish | Stop after 2 | 8 cm | 3 cm | Rings, stud earrings |
| Trinket dish | Stop after 3 | 12 cm | 4 cm | A watch, chains, hair clips |
| Catch-all bowl | Stop after 4 | 16 cm | 5 cm | Keys, sunglasses, a phone |
Swipe the table sideways to see every column.
Making the Crochet Heart Trinket Dish
Start the ring
This replaces the magic ring, and it takes about forty seconds.
- Make a slip knot and slide it onto the 5 mm hook. Snug, not tight.
- Chain 4. The loop on the hook is never one of them.
- Slip stitch into the first chain you made, furthest from the hook. You now have a small closed ring.
- Chain 3, which stands in for your first double crochet.
Round 1: where the heart appears
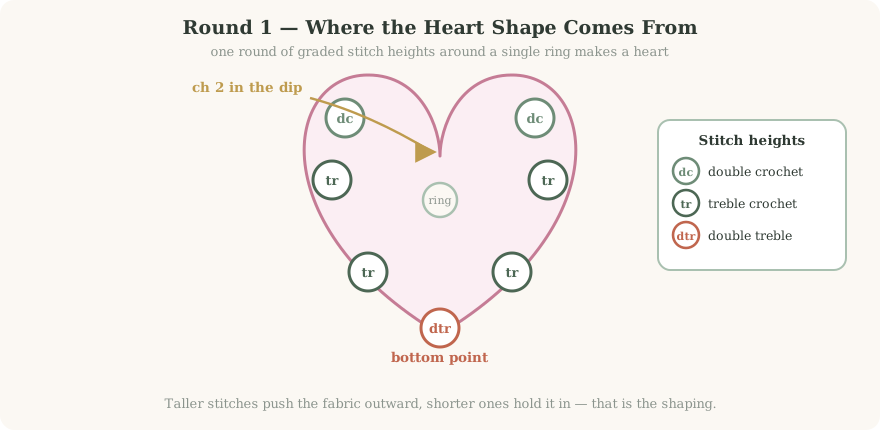
All of round 1 goes into that one small ring. The shape comes from stitch height alone: tall stitches push the fabric outward into a lobe, short ones hold it in at the dip.
- Short at the top. Double crochets either side of the centre dip.
- Taller round the outside. Trebles carry the curve of each lobe outward and back down.
- Longest at the bottom. One double treble makes the point, with a chain 2 worked into it to keep the corner sharp.
- Chain 2 at the centre dip before closing. That chain space stops the lobes merging into one hump.
- Slip stitch to join, then pull the starting tail to close the centre hole.
Rounds 2 and 3: grow it flat
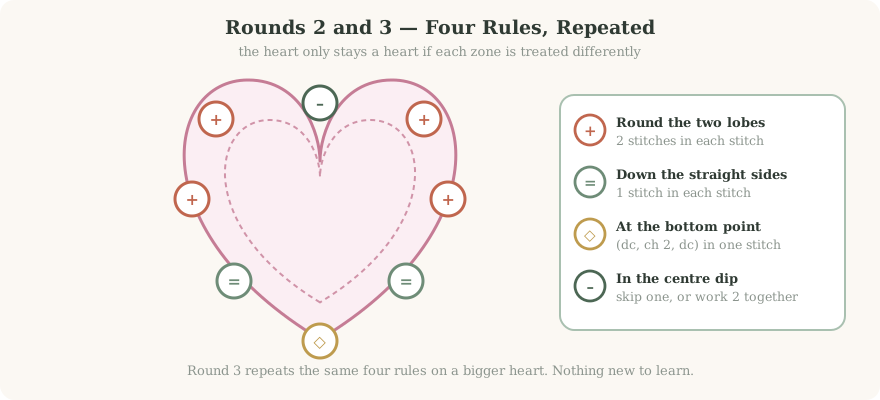
Both rounds follow the same four rules. Round 3 is round 2 on a bigger heart.
- Around the two lobes, increase. Two stitches into each stitch below, all the way round each curve.
- Down the straight sides, work plain. One stitch into each, along the diagonals running toward the point.
- At the bottom point, work a corner. Dc, ch 2, dc, all three into the same stitch or chain space.
- At the centre dip, take one away. Skip a stitch or work two together. Without this the dip fills in.
- Slip stitch to join, then lay the piece flat.
Rounds 4 to 6: build the wall
- Round 4, back loops only. Chain 1, then single crochet into the back loop of every stitch around, keeping the corner and dip decrease as before.
- Feel it hinge. A third of the way round, the base lifts off the table on its own.
- Rounds 5 and 6, both loops. Single crochet round, no increases except the point corner. This keeps the wall vertical instead of flaring.
- Slip stitch to join and cut the yarn, leaving a 15 cm tail.
Weaving in
- Work on the inside of the wall, never the base. Anything on the base shows up under a ring.
- Change direction twice. Weave 3 cm one way, back 2 cm, then 2 cm sideways. A tail travelling in one line works itself out.
- Trim close and stretch the fabric so the end disappears inside.
- Repeat with the starting tail, after using it to snug the ring shut.
Fixing What Goes Wrong, and What to Try Next
Troubleshooting
| What you are seeing | What caused it | How to fix it |
|---|---|---|
| The base ruffles | Too many increases on the lobes | Rip back a round; increase every other stitch on the curves |
| The base cups too early | Too few increases | Add two increases per lobe next round |
| It looks like a circle | The dip was not decreased | Skip or work two together at the dip, every round |
| The point is rounded | No chain-2 corner there | Work dc, ch 2, dc into one stitch, every round |
| The wall leans outward | Round 4 used both loops | Undo round 4 and redo it in back loops |
| The centre has a hole | The starting tail was never pulled | Pull it firmly, then secure it with the first weave |
Swipe the table sideways to see every column.
Variations worth making
- Two-tone rim. Change colour for rounds 5 and 6. The ridge does the separating for you.
- A pair that stack. One ring-dish, one catch-all, and the small one nests inside the large one.
- Deeper box. Six wall rounds holds a folded pair of socks.
- Flat applique. Stop after round 3 for a motif to sew onto a bag, a blanket square or a card.
- Cotton for gifting. Mercerised cotton keeps its edge for years and survives a wash, which acrylic does not.
How long it takes
| Stage | First time | Once familiar |
|---|---|---|
| Ring and round 1 | 25 min | 5 min |
| Rounds 2 and 3 | 45 min | 20 min |
| Wall rounds 4 to 6 | 35 min | 18 min |
| Weaving in | 10 min | 4 min |
| Total | About 2 hours | About 45 min |
Swipe the table sideways to see every column.
Looking after it
| Fibre | Washing | Getting the shape back |
|---|---|---|
| Cotton | Hand wash cool, do not wring | Stuff with a rolled towel, air dry |
| Acrylic | Hand wash cool, no heat | Reshape damp; heat flattens it for good |
| Wool blend | Wool cycle or hand wash | Block over a small bowl overnight |
Swipe the table sideways to see every column.
Frequently Asked Questions About the Crochet Heart Trinket Dish
Can I really make this without a magic ring?
What yarn weight works best for a crochet heart trinket dish?
Why has my heart turned into a circle?
How do I stop the walls flaring outward?
Can I make it bigger without rewriting the pattern?
Does it need stiffening spray or a fabric base?
How much yarn does one dish use?
Is this a good first crochet project?
One Evening, One Dish
Tomorrow morning the earrings will be in one place. That is the whole point of it, and a good return on two hours and forty metres of yarn.
The techniques carry further than the project does. The chain ring starts every round piece you will ever make, and the back-loop fold builds every basket and hat. You learned both on something small enough that getting it wrong cost nothing.
Your quick start checklist:
- Worsted weight (4) yarn, about 40 m, in a light solid colour
- 5 mm hook, scissors, tapestry needle
- Chain 4, slip stitch to join, chain 3
- Round 1: dc at the dip, tr round the lobes, dtr at the point, ch 2 in the dip
- Rounds 2–3: increase on the lobes, plain on the sides, corner at the point, decrease at the dip
- Round 4: single crochet in back loops only, which is the wall
- Rounds 5–6: single crochet, both loops, no increases
- Weave in on the inside, changing direction twice
How wide did yours come out?
Lay it flat, measure lobe to lobe, and leave the number in the comments with the yarn you used.
It tells the next person whether to add a fourth round.


4 Comments