How to Crochet the Viral Rose Bouquet Blanket
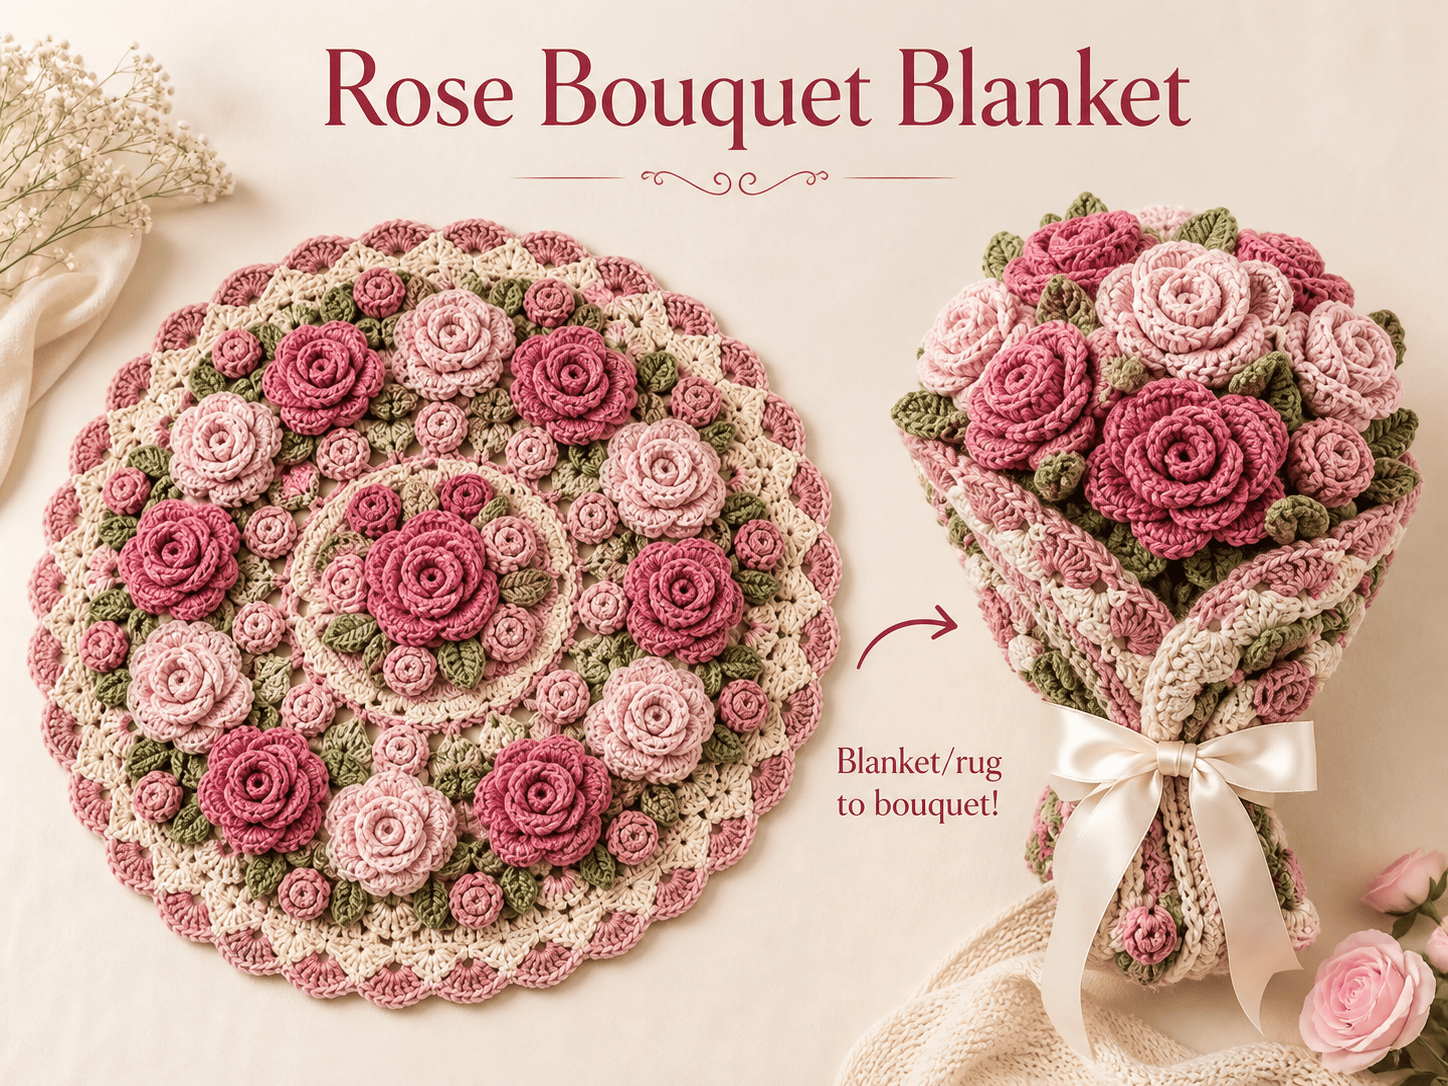
A cozy double-crochet circle blanket topped with a cluster of hand-built 3D roses — worked with a simple chain start, no magic ring required.
You have seen it in your feed a dozen times: a soft, oversized circle blanket with a bouquet of dimensional roses blooming across one edge, looking like it took a month to finish. You screenshotted it, maybe even bought the yarn, then let it sit in a bag — because surely a project that looks like that starts with a magic ring you can never cinch tight enough.
It does not. The crochet rose bouquet blanket that keeps going viral is built from one repeating rule, worked in continuous rounds from a plain chain-3 ring instead of an adjustable loop. Once that rule clicks, your hands do the counting for you.
This guide walks you through the chain-start foundation, the +12-stitch increase that keeps the circle flat, the scalloped leaf border, and the graduated chain-14 fan behind each 3D rose petal — plus the troubleshooting to catch a mistake before it costs you a whole round.
Meet the Viral Flower Blanket Crochet Project
This pattern builds a circular granny-style blanket base worked outward from a tight center in continuous double-crochet rounds, then finishes it with two decorative layers: a green scalloped leaf border around the whole edge, and a cluster of separately-crocheted 3D rose petals sewn on afterward. Nothing here is advanced — the base is a repeating increase, the border is one 3-chain loop, and the roses are a single graduated row. The “viral” look comes from how the three pieces stack together, not from any one hard technique.
- A cozy, infinitely expandable blanket base built from simple double crochet repeats
- A reliable chain-3 ring foundation that stands in for the magic ring entirely
- A scalloped leaf border worked in contrasting green yarn around the finished edge
- Three-dimensional rose petals, crocheted separately and clustered into blooms
- Real confidence counting stitches and reading a repeat instead of memorizing rows
Materials & Tools
You need three yarn colors — a main color for the body, green for the border, one or two rose shades for the flowers — plus a single hook size throughout. Worsted weight (Craft Yarn Council category 4) gives this blanket its signature drape; see the Craft Yarn Council’s yarn weight standards if you want to substitute a different weight.
| Item | Specification | Notes |
|---|---|---|
| Main yarn | 900–1500 yds worsted weight (4) | Acrylic or cotton blend for drape and softness |
| Border yarn | Small amount worsted weight (4) | Sage or forest green for the leaf border |
| Flower yarn | Small amount worsted weight (4) | Dusty rose, red, or blush for the 3D roses |
| Crochet hook | 5.5mm (US I/9) | Matches worsted weight yarn perfectly |
| Scissors | Sharp, small blade | For clean, close yarn cuts |
| Tapestry needle | Large eye, blunt tip | For weaving in ends and sewing on flowers |
| Stitch marker | Any removable type | Marks the first stitch of every round |
Swipe the table sideways to see every column.
The Foundation: Round 1 Without a Magic Ring
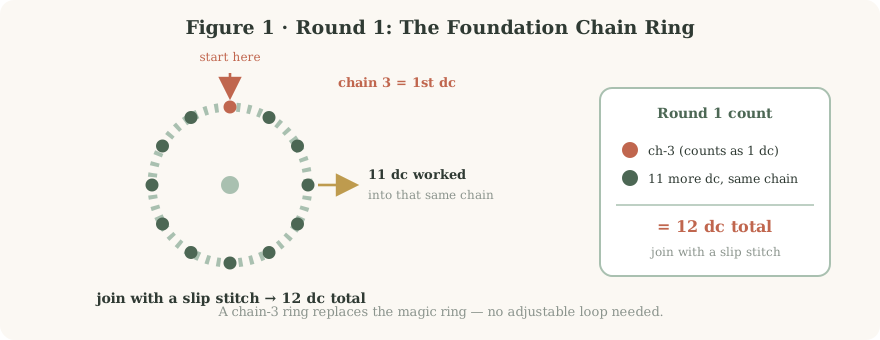
Round 1 sets the tone for the entire blanket. Working into a starting chain instead of an adjustable loop removes the one step that stalls most beginners, while still closing into a tight, professional-looking center once you pull the tail.
- Make a slip knot and place it on your 5.5mm hook. Pull it snug, not tight.
- Chain 3. This starting chain-3 counts as your first double crochet of the round — do not work an extra stitch into it later.
- Work 11 more double crochets into that very first chain you made (the one closest to the slip knot), so all 12 stitches share one small ring.
- Join the round with a slip stitch into the top of the beginning chain-3.
- Count your stitches: including the chain-3, you should have exactly 12 double crochets in the ring. Pull the starting tail to snug the center hole closed.
Expanding the Blanket: Rounds 2 and Beyond
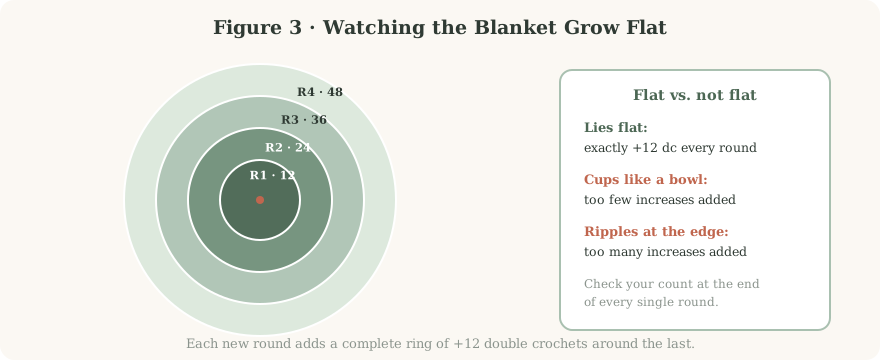
To keep a circular blanket lying flat, you add a fixed number of new stitches every round — for this pattern, exactly 12 new double crochets per round. That steady rhythm is what turns a plain circle into the subtly scalloped, 12-point base this blanket is known for.
Round 2 — work into every stitch of Round 1
- Chain 2. This counts as your first double crochet of the round.
- Work 1 more double crochet into that same starting stitch, then chain 1. You now have 2 dc worked into stitch 1 of Round 1.
- Work 2 double crochets into the next stitch, then chain 1. That is stitch 2 of Round 1 done.
- Repeat “2 dc, chain 1” into every remaining stitch of Round 1 — 10 more times — so all 12 stitches from Round 1 end up with 2 double crochets and a chain-1 space after each one.
- Join with a slip stitch to the top of the beginning chain-2.
- Stitch count check: 12 stitches × 2 dc each = 24 double crochets total.
Round 3 — one increase, one plain stitch, repeated
- Chain 2 (counts as your first dc).
- Work 1 more double crochet into that same stitch, then chain 1. This is your first increase corner (2 dc total).
- Work 1 double crochet into the very next stitch — the second dc of the same Round 2 pair, sitting right beside the one you just used — then chain 1. This is a plain, non-increased stitch.
- Skip the chain-1 space left over from Round 2 (not the ones you just made) and work 2 double crochets into the top of the next stitch, then chain 1. This is your next increase corner.
- Repeat steps 2–4 around the whole round — 11 more times — so you complete this 3-step corner-plus-plain sequence 12 times in total.
- Join with a slip stitch to the top of the beginning chain-2.
- Stitch count check: 12 corners × 2 dc, plus 12 plain dc, = 36 double crochets total.
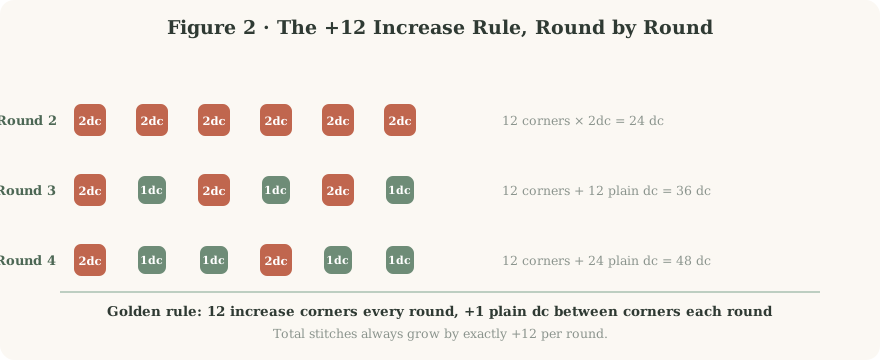
The golden rule for every round after that
From Round 4 onward, add one more plain double crochet between each increase corner every round. Round 4 has two plain dc between corners; Round 5 has three; Round 6 has four, and so on. There are always exactly 12 increase corners spaced evenly around the circle — only the plain stitches between them grow. That is why your total stitch count climbs by exactly 12 every round, no matter how large the blanket gets.
Blanket Pattern at a Glance
| Round | Instructions Summary | Stitch Count |
|---|---|---|
| 1 | Chain 3 (counts as dc), 11 dc into that same chain, join with a slip stitch | 12 |
| 2 | Chain 2 (counts as dc); (2 dc in next st, ch 1) 12 times total around | 24 |
| 3 | Chain 2; (2 dc in corner st, ch 1, 1 dc in next st, ch 1) 12 times total around, skipping Round 2’s ch-1 spaces | 36 |
| 4 | Same pattern with 2 plain dc between each of the 12 corners | 48 |
| 5+ | Add one more plain dc between corners every round; 12 corners stay fixed | +12 per round |
Swipe the table sideways to see every column.
Whatever round you are on, the check is the same: 12 increase corners, evenly spaced, and your total stitch count divisible by 12.
The Scalloped Leaf Border
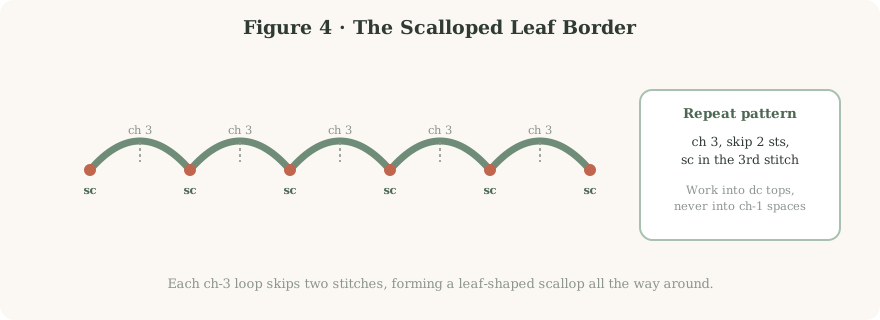
Once the blanket base has reached the size you want, frame it. The scalloped leaf border gives the edge a finished, deliberate look and doubles as the green backdrop your 3D roses will be sewn onto.
- Attach your green yarn anywhere along the outer edge with a slip knot, and pull up a loop.
- Chain 3.
- Skip the next 2 stitches along the blanket’s edge.
- Work 1 single crochet into the 3rd stitch away.
- Repeat “chain 3, skip 2, single crochet in the next” all the way around the full circumference of the blanket.
- Join the round with a slip stitch into the space at the base of your very first chain-3 loop.
- Chain 1, cut the yarn, and pull the tail through to fasten off.
Crocheting the 3D Roses
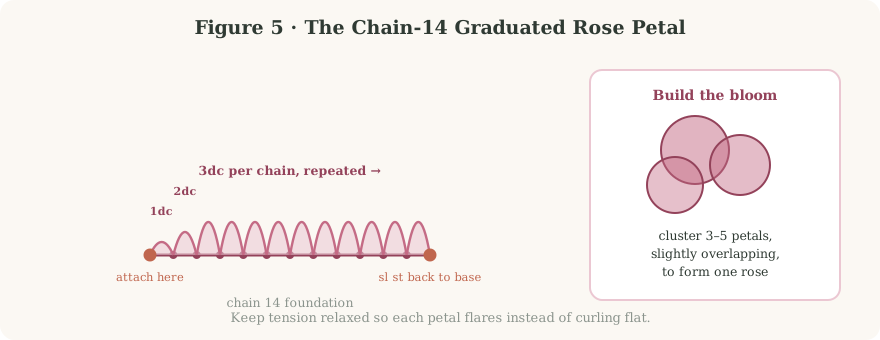
This is the signature element that makes a crochet rose blanket stand out from a plain granny circle. Each petal is worked flat from a single foundation chain, then curled into a cluster. Crochet petals directly onto the blanket, or make them separately and sew them on once the border is finished — separate petals are easier to arrange before you commit to a layout.
- Attach your flower yarn at your chosen spot (or start a fresh strand if working separately). Pull up a loop and chain 1 to anchor the tail.
- Chain 14.
- Work into the 3rd chain from the hook: place 1 double crochet.
- Work into the next chain: place 2 double crochets.
- Work into each of the remaining 10 chains: place 3 double crochets into every chain (12 chains worked in total, from the 3rd chain to the last). This graduated jump from 1, to 2, to 3 dc per chain is what makes the petal flare outward.
- Return to the base: once you reach the last chain, insert your hook into the very first stitch where you attached the yarn.
- Slip stitch to close the petal into a curved shape.
- Repeat this same petal 3 to 5 times, overlapping each new petal slightly against the last, to build one full, blooming rose.
Finishing & Care
Proper finishing is what separates a handmade blanket from a professional-looking one, and it protects the hours you put into it.
- Weave in every end with a tapestry needle, threading the tail through the back loops of nearby stitches so it cannot work loose.
- Block the blanket if needed. Lightly mist it with water and pin it into an even circle on a flat surface to dry — this evens out any small tension differences between rounds.
- Secure the roses. If you crocheted them straight onto the blanket, weave the tails through the base of the petals to lock them in place. If made separately, whip-stitch them on firmly with matching thread.
- Wash on a gentle, cool cycle (or hand wash) and lay flat to dry. Avoid high heat — it flattens acrylic’s loft and can shrink cotton.
Troubleshooting Common Issues
| Problem | Cause | Solution |
|---|---|---|
| Blanket cups like a bowl | Not enough increases per round | Frog back to the last flat round and confirm you added exactly 12 stitches. |
| Edges ripple or wave heavily | Too many increases per round | Skip one increase corner in the next round to flatten the fabric. |
| Large hole in the center | Starting chain-3 was left too loose | Pull the initial yarn tail tight to cinch the hole shut, then weave it in securely. |
| Roses look flat, not 3D | Petal stitches worked too tightly | Use a hook one size larger for the flowers, or consciously loosen your tension. |
| Border looks stretched out | Working into chain spaces instead of stitches | Insert the hook into the top two loops of the actual double crochet stitches only. |
| Stitch count keeps drifting | Losing track mid-round on a large blanket | Place a stitch marker at the start of every round and count corners, not stitches, once you pass Round 6. |
Swipe the table sideways to see every column.
Frequently Asked Questions About the Crochet Rose Bouquet Blanket
Can I make this blanket with a different yarn weight?
How many roses should I put on the blanket?
Why does my blanket have 12 subtle points instead of a perfect circle?
Can I use single crochet instead of double crochet for the base?
What if I lose my stitch count partway through a large round?
Do I have to use a magic ring at all with this pattern?
How long does one 3D rose take to crochet?
Can I attach the roses somewhere other than one corner?
You Are Ready to Crochet This Blanket
You now have every number this project needs, from the very first chain-3 ring to the last rose petal. It looks like a showpiece because the finished pieces layer well together — not because any single step is difficult.
Your quick-start checklist:
- Gather your worsted weight yarn in three colors and a 5.5mm hook.
- Chain 3, work 11 dc into that chain, join — no magic ring needed.
- Add exactly 12 new double crochets every round to keep the circle flat.
- Frame the edge with the chain-3 scalloped leaf border.
- Build 3–5 chain-14 petals per rose and cluster them into a bouquet.
- Weave in every end and block before you call it finished.
Take it one round at a time, count before you join, and let the blanket bloom at its own pace.
Made your own rose bouquet blanket?
Snap a photo of your finished blanket, or of a single rose cluster if you are still mid-project — seeing how your color choices turned out helps other beginners more than any written description could.