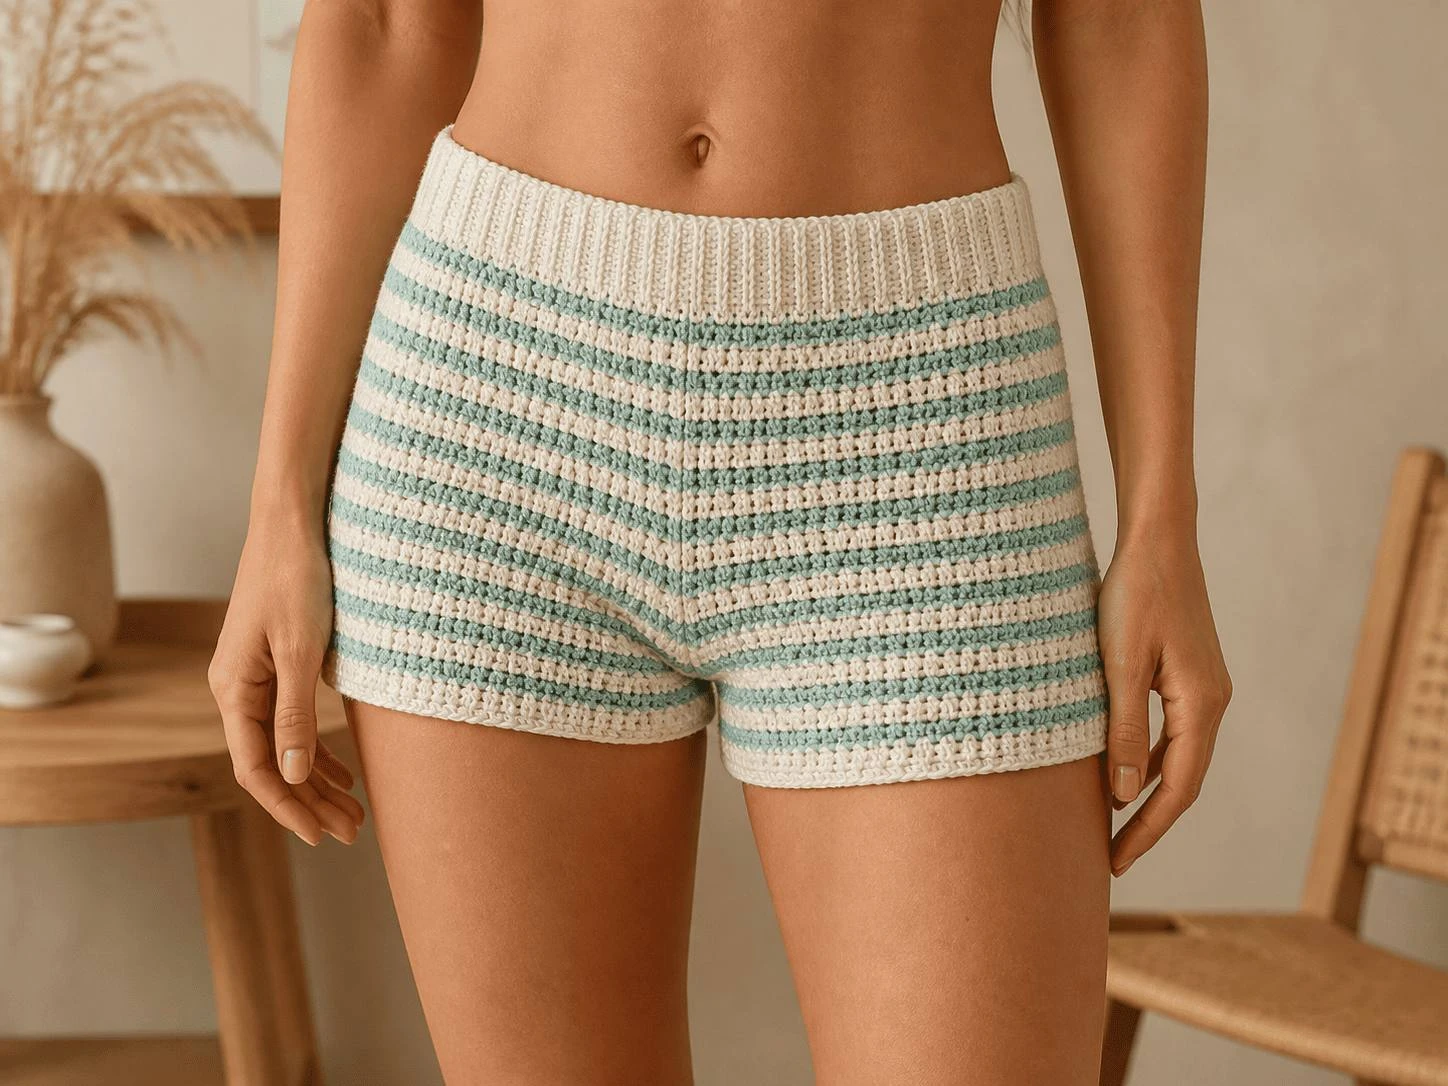
Crochet Shorts for Beginners: The Striped Pattern That Starts With One Simple Rectangle
There is a line most crocheters stop at, and it is not a stitch. It is the moment a pattern stops saying scarf and starts saying garment.
Blankets, bags, hats, scrunchies — fine. But clothes feel like a different sport. Sizing charts with six columns. Shaping, ease, gauge that actually matters. Somewhere in there you decide you are not ready, and you go and make another scarf.
Here is what nobody tells you: a pair of crochet shorts is a rectangle and a tube. You make a ribbed strip, join it into a ring, work stripes down from it, and near the bottom chain a few stitches across the middle to turn one hole into two. No shaping. No sizing chart, because you measure yourself.
If you can make a rectangle and count to three, you can make these. If you would rather warm up on something smaller first, the crochet mesh hairband uses the same measure-as-you-go approach in ten minutes. This is the project that moves you across the line.
What Makes These Crochet Shorts a Beginner Project
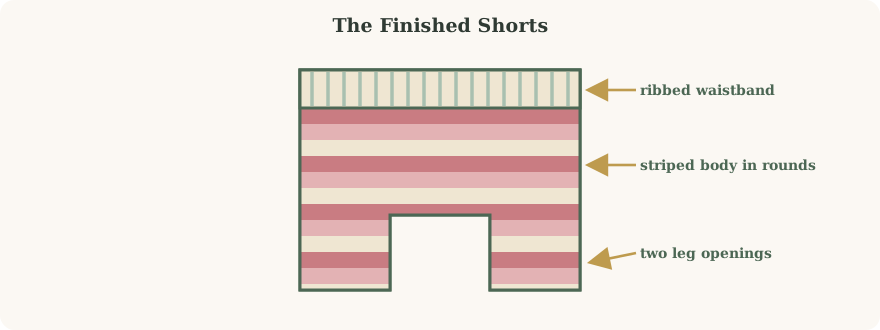
These crochet shorts are two pieces that become one: a ribbed waistband made as a flat strip, and a striped body worked in rounds down from it. The stripes are pure colour changes, and the leg openings come from chaining across the middle of the tube rather than from any shaping.
The Whole Build in Four Stages
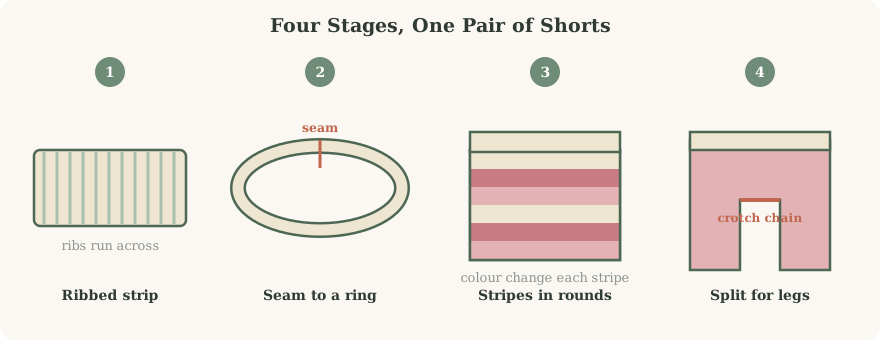
- The waistband — a flat ribbed strip worked in rows, as long as your waist
- The seam — the two short ends joined together to make a ring
- The body — worked in rounds off the long edge of that ring, changing colour for stripes
- The legs — a short chain across the middle of the tube turns one opening into two
Why This Is a Gentler First Garment Than Most
Three things make this easier than the sweater you have been circling for a year.
First, it is sized by measurement, not by pattern size. No working out whether you are an M or an L, or what a fixed amount of positive ease means for your own fit. You wrap the band round your waist and stop when it fits.
Second, the stitch never changes. Past the waistband you repeat one stitch for the whole body. The stripes do the visual work while your hands do the same simple thing.
Third, mistakes are cheap. The body grows top-down in rounds, so if the shorts are too short you keep going, and if they are too long you pull back a round. Nothing gets reassembled.
What You Need to Crochet Shorts
Short list, nothing unusual on it.
| Material or Tool | Recommended Spec | Notes for Beginners |
|---|---|---|
| 🧶 Yarn | Worsted weight (#4), three colours | One main colour for the waistband and a stripe, two accent colours for the rest |
| 🪝 Crochet Hook | 4.5 mm | A slightly tighter hook than usual for worsted — you want firm fabric, not drapey lace |
| ✂ Scissors | Any sharp pair | You will cut yarn at every colour change, so keep them next to you |
| 🧵 Tapestry Needle | Blunt tip | Unavoidable here. Every stripe leaves two ends to weave in |
| 📏 Measuring Tape | Standard fabric tape | The most important tool on this list. The whole pattern is sized from it |
Swipe the table sideways to see every column.
Choosing Yarn That Behaves in a Garment
Shorts sit against skin and take real wear, so fibre matters more here than in a hat. Weights follow the Craft Yarn Council weight system.
- Cotton or a cotton blend: the best all-round choice. Breathable, holds stitch definition, and the stripes stay crisp
- Acrylic: cheapest and comes in every colour, which makes stripe planning easy. Can feel warm for summer wear
- Cotton-bamboo: softest against skin and the nicest drape, at a higher price
- Avoid pure wool: it stretches under body heat and will not spring back, so the shorts grow through the day
Planning Three Colours That Actually Work
| Role | What It Does | Pick Something… |
|---|---|---|
| Main / waistband | Frames the whole garment | Neutral — cream, oat, black, grey |
| Stripe A | The strongest colour, reads first | Saturated, a clear step away from the main |
| Stripe B | Softens the jump between the other two | A lighter version of Stripe A |
Swipe the table sideways to see every column.
The Stitches and Abbreviations You Need
Nothing advanced here. The only technique that may be new is working into the back loop, and that is a change of aim, not a change of stitch.
| Stitch | Short Form | What It Does | Where You Use It |
|---|---|---|---|
| Chain | ch | Makes the foundation, and bridges the crotch | Start of the waistband, and the leg split |
| Half Double Crochet | hdc | A short, dense stitch that makes firm fabric | Waistband and body |
| Back Loop Only | BLO | Working under one loop instead of two, which leaves a ridge | Every waistband row |
| Slip Stitch | sl st | Joins without adding height | Seaming the ring, closing each round |
| Fasten Off | FO | Locks the last loop | End of the waistband and each colour |
Swipe the table sideways to see every column.
Back Loop Only, in One Picture
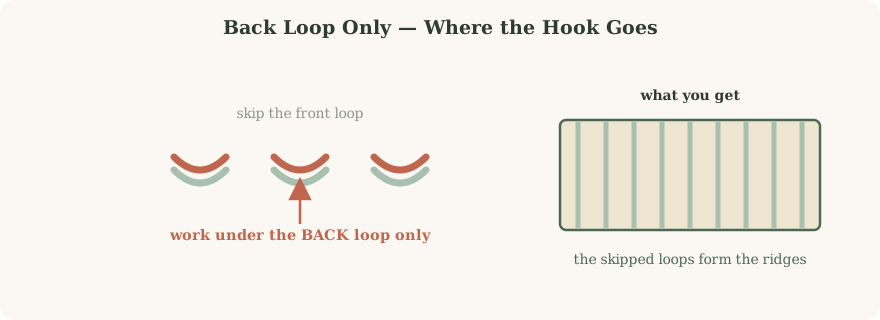
Look at the top of any stitch and you see two loops shaped like a V. Normally your hook goes under both. For the waistband it goes under the back one only, the loop furthest from you.
The front loops you skipped do not disappear. They sit on the surface as a raised line, and stacked over twenty or thirty rows they make the corrugated, stretchy fabric that lets a waistband hold on.
Sizing Crochet Shorts Without a Pattern Size
Three measurements decide everything, and you can take them all in two minutes.
- Waist. Measure round the narrowest part of your waist, or wherever you actually want the shorts to sit. This sets how long the ribbed strip needs to be.
- Hip. Measure round the fullest part of your hips. The body of the shorts has to clear this comfortably, so it sets how many stitches you work into the waistband edge.
- Rise. Measure from your waist down to where you want the crotch to sit. This tells you when to stop working full rounds and split for the legs.
How Each Measurement Maps to the Pattern
| Your Measurement | Controls | How to Use It |
|---|---|---|
| Waist | Length of the ribbed strip | Work rows until the strip is 2–4 cm shorter than your waist — ribbing stretches |
| Hip | Stitches round the body | Work enough stitches into the waistband edge that the tube slides over your hips without pulling |
| Rise | Rounds before the split | Keep working stripes until the tube reaches your rise measurement, then chain across |
| Inseam | Rounds after the split | A couple of rounds for very short shorts, more for a longer leg |
Swipe the table sideways to see every column.
How to Crochet Shorts, Step by Step
Five stages. Take your time on the first — a straight, even waistband makes everything after it easier.
Step 1: The Ribbed Waistband Strip
- Make a slip knot and chain the height you want your waistband to be. This chain is not the length of the band — it is the depth of it, so a short chain gives a narrow band.
- Work one half double crochet into each chain across. This first row is worked normally, through both loops.
- Chain 1 or 2, turn, then work hdc in the back loop only across the row.
- Repeat that row. Every row adds one rib. Keep going until the strip wrapped round your waist is 2–4 cm short of meeting.
Step 2: Seam It Into a Ring
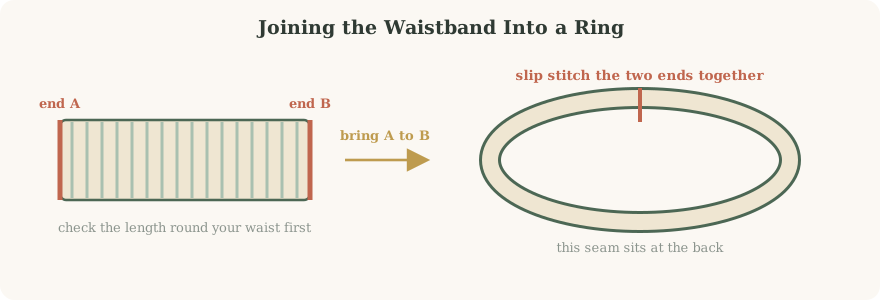
- Fold the strip so the two short ends meet, with the right side facing out.
- Line the ends up rib for rib so the join does not sit at an angle.
- Slip stitch through both layers all the way along the edge, then fasten off.
That seam becomes the centre back, so any wobble in it ends up where nobody looks.
Step 3: Start the Striped Body
- Turn the ring so one long edge faces you. This edge is the row-ends of your ribbing, and it is where the body grows from.
- Join your first body colour anywhere along that edge and work evenly around, spacing stitches so the tube clears your hips.
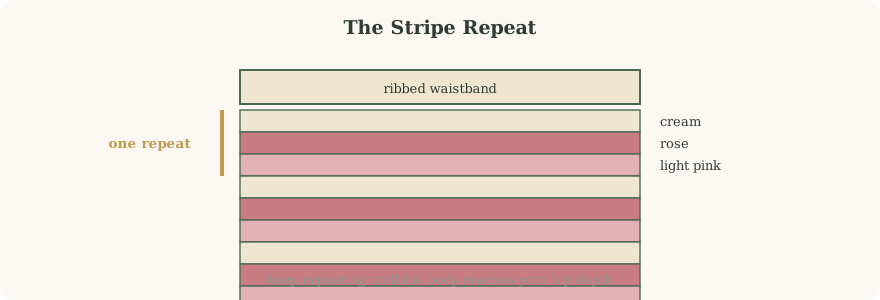
- Join the round, then keep working rounds. When a stripe is deep enough, cut the yarn and join the next colour.
- Repeat your three-colour sequence down the body until the tube reaches your rise measurement.
Step 4: Split for the Leg Openings
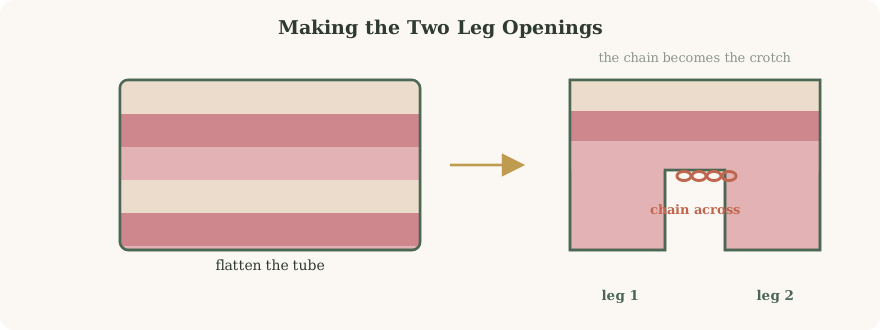
- Lay the tube flat with the seam at the back and find the centre point of the front and the back.
- Work round until you reach that centre point.
- Chain a small number of stitches — enough to bridge the gap comfortably without pulling — and join to the matching point on the opposite side.
- That chain is your crotch. You now have two separate leg openings.
Work each leg in rounds for your inseam length, carrying the stripe sequence through, then fasten off.
Step 5: Weave In and Wear
Every colour change left two ends. Thread each onto a tapestry needle and run it through stitches of the same colour, changing direction at least once so it cannot work loose.
What Goes Wrong, and How to Fix It
| Problem | Cause | Fix |
|---|---|---|
| Waistband slides down | The strip was made to your exact waist measurement | Take out rows until it is 2–4 cm short — ribbing needs to stretch to grip |
| Shorts will not go over your hips | Too few stitches in the first body round | Pull back the round and add stitches along the waistband edge |
| The body flares out | Too many stitches in the first body round | Fewer stitches, or the same count on a smaller hook |
| A visible jog where stripes change | Colour changed at the join of the round | Change colour on the last pull-through of the previous round’s final stitch |
| Fabric is stiff and boardy | Hook too small for the yarn | Go up half a millimetre — you want firm, not armoured |
| Legs sit oddly / crotch pulls | The crotch chain is too tight | Redo it with one or two more chains |
Swipe the table sideways to see every column.
Almost everything there is decided in one round: the first body round. Get that count right and the rest is repetition.
Five Ways to Change Them
- Colour block instead of stripes: one colour for the top half, one for the bottom — far fewer ends to weave in
- Wide single stripe: keep the whole body neutral and run one bold band across the hip
- Longer leg: keep working rounds after the split for bike-short length
- Ribbed cuffs: finish each leg with a few BLO rounds so the hems match the waistband — the same ribbing idea used in the crochet basic hairband
- Drawstring: chain a long cord and thread it through the ribbing for an adjustable waist
How Long Does It Really Take?
| Where You Are | Realistic Time | Hardest Part |
|---|---|---|
| Complete beginner | A full weekend | The first body round and the leg split |
| Confident beginner | Two or three evenings | Keeping stripe depths even |
| Experienced | One long evening | Nothing much — it is repetition |
Swipe the table sideways to see every column.
Washing and Wearing
| Yarn | Washing | Drying |
|---|---|---|
| Cotton | Cool machine wash in a mesh bag, or hand wash | Dry flat and reshape while damp |
| Acrylic | Cool machine wash | Air dry flat — heat flattens the stitches |
| Cotton-bamboo | Hand wash cool only | Dry flat, away from direct sun |
Swipe the table sideways to see every column.
Frequently Asked Questions About Crochet Shorts
How much yarn do I need to crochet shorts?
What hook size is best for crochet shorts?
Can a complete beginner crochet shorts?
Are these crochet shorts written in US or UK terms?
Will crocheted shorts stretch out when I wear them?
How do I stop the stripes from jogging at the seam?
Can I make these without stripes?
Can I sell shorts I make from this pattern?
The Line Is Closer Than It Looks
Go back to that line between accessories and clothes. It is not made of technique. It is made of the feeling that garments belong to people who know more than you do.
But you did not learn a new stitch to get here. You made a rectangle, joined it into a ring, worked one stitch round and round while the colours changed, and chained across a gap. You could already do every one of those things. They were just arranged into the shape of a garment.
Your quick start checklist:
- Pick three worsted weight colours — one neutral, two tones of one shade
- Measure your waist, hip and rise before you make a single stitch
- Work the ribbed strip in back loop only until it is 2–4 cm short of your waist
- Seam it into a ring and put the join at the back
- Work the striped body in rounds down to your rise measurement
- Chain across the middle, work both legs, weave in as you go
Making a pair? Tell us your numbers.
Drop a comment with your waist measurement and how many ribs your waistband ended up at — that is the single most useful number for anyone starting theirs.
And if the first body round is fighting you, say what is happening and we will work out the count together.