
Crochet Breakfast Keychains: 5 Miniature Food Patterns
There is a particular kind of joy that only comes from making something tiny. A crocheted croissant that fits in your palm, a fried egg the size of a coin — these small pieces make you grin in a way a full-size blanket never quite does.
Maybe you have a drawer of leftover yarn scraps and no plan for them. Maybe you want a project you can finish in one sitting instead of one that sits half-done on the arm of the couch for a month. Either way, miniature amigurumi food solves both problems at once.
This tutorial walks you through five crochet breakfast keychains: a croissant, a fried egg, a pretzel, a chocolate chip cookie, and a slice of toast. Every stitch count below has been checked round by round against the previous round’s total, so any inconsistency has been corrected.
Pick one to start, or work through all five and string them into a garland for your kitchen window.
What You Will Make
This tutorial covers five distinct pieces of miniature food crochet. Each one uses only basic stitches — single crochet, half double, double, increases and decreases — combined in clever ways to build a shape you will recognize instantly.
- Croissant: a crescent-shaped pastry worked as a tube, then bent and shaded for realistic ridges.
- Fried Egg: a flat yellow yolk with a color-changed white worked in a deliberately wobbly outline.
- Pretzel: a long thin tube, 44 rounds of it, crossed and folded into the classic knot shape.
- Chocolate Chip Cookie: two matching discs, lightly stuffed, sewn together with embroidered chips.
- Toast: a square worked in rows with a contrasting crust border stitched around all four sides.
Materials & Tools
Since these are small items, this is a perfect project for using up leftover yarn scraps from other projects. You will need four colors at minimum: white, light brown, dark brown, and yellow.
| Item | Specification | Notes |
|---|---|---|
| Yarn | Cotton (5ply), acrylic, sport weight, or thin chenille | Colors: white, light brown, dark brown, yellow |
| Crochet hook | 3mm (US size D/3 to E/4) | Keeps stitches tight and small for a mini scale |
| Stuffing | Polyfill, pulled into small wisps | Needed for the croissant, pretzel, cookie, and toast |
| Eyeshadow | Brown shades, optional | For dusting realistic shading onto the croissant ridges |
| Notions | Stitch markers, darning needle, sharp scissors | Essential for shaping and finishing every piece |
| Hardware | Split rings, jump rings, lobster clasps | For turning each finished piece into a keychain |
Swipe the table sideways to see every column.
Crochet Abbreviations
This pattern uses standard US crochet terms throughout. Keep this table nearby as you work through each section — the croissant and toast patterns especially lean on FLO, BLO, increases, and decreases.
| Abbreviation | Term | Abbreviation | Term |
|---|---|---|---|
| ch | Chain | hdc | Half double crochet |
| st / sts | Stitch / stitches | dc | Double crochet |
| R | Round / row | slst | Slip stitch |
| mr | Magic ring | BLO | Back loop only |
| sc | Single crochet | FLO | Front loop only |
| inc | Increase (2 sc in same stitch) | dec | Decrease (2 sc worked together) |
| * | Repeat the sequence in parentheses | [ ] | Total stitch count at the end of the round |
Swipe the table sideways to see every column.
Croissant
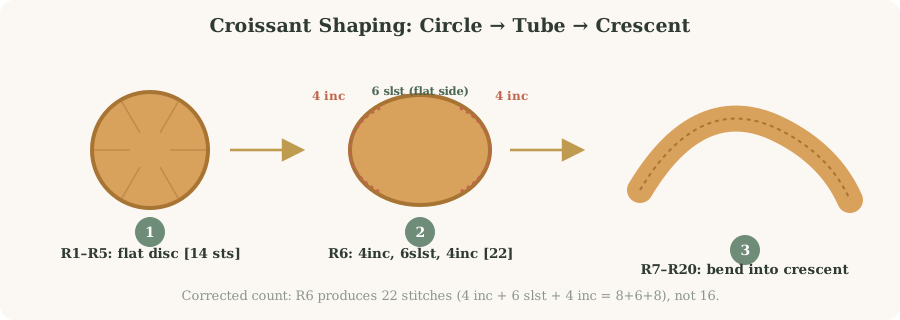
The croissant is the most satisfying build in this set because you can watch it change from a flat disc, to a tube, to a curved crescent in your hands. Use light brown yarn for the entire body — you will add the shading and icing details after stuffing.
- R1: Start with a magic ring. Work 7 single crochet stitches into the ring. Pull the tail to close. [7]
- R2: Chain 1. Work an increase in every stitch around. Slip stitch to join. [14]
- R3–R5: Chain 1. Work 1 single crochet in each stitch around, for 3 rounds. [14]
- R6: Chain 1. Work 4 increases, 6 slip stitches, then 4 more increases. The slip stitches flatten one side while the increases fan the other two out — this is what creates the curve. [22]
- R7: Chain 1. Work 8 single crochets, then 6 single crochets in the Front Loop Only (FLO), then 8 single crochets, working one stitch into each of the 22 stitches from R6. [22]
- R8–R14: Chain 1. Work 22 single crochets in each round, for 7 rounds. This builds the length of the pastry. [22]
- R15: Chain 1. Work 8 single crochets, 6 slip stitches, 8 single crochets. [22]
- R16: Chain 1. Work 4 decreases, 6 single crochets in FLO, 4 decreases. [14]
- R17–R19: Chain 1. Work 14 single crochets, for 3 rounds. [14]
- R20: Chain 1. Work 7 decreases to close the end. [7]
Finishing the Croissant
Cut the yarn, leaving a long tail, and thread it onto a darning needle. Weave the tail through the front loops of the last 7 stitches and pull tight to close the hole. Stuff the tube lightly with polyfill. Bend the tube into a crescent shape, then use the yarn tails to sew the two ends together securely on the underside. For a realistic finish, use a makeup brush with brown eyeshadow to dust the ridges. Finally, embroider a few thin lines of white yarn across the top to suggest icing.
| Round | Instructions | Stitch Count |
|---|---|---|
| R1 | 7sc in mr | 7 |
| R2 | 7inc | 14 |
| R3–R5 | 14sc | 14 |
| R6 | 4inc, 6slst, 4inc | 22 |
| R7 | 8sc, FLO 6sc, 8sc | 22 |
| R8–R14 | 22sc | 22 |
| R15 | 8sc, 6slst, 8sc | 22 |
| R16 | 4dec, FLO 6sc, 4dec | 14 |
| R17–R19 | 14sc | 14 |
| R20 | 7dec | 7 |
Swipe the table sideways to see every column.
Fried Egg
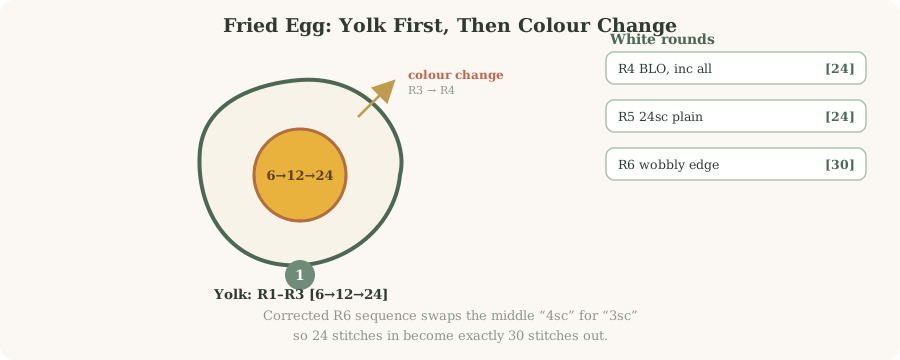
The fried egg is a flat project that works up in one sitting. You build the yellow yolk first, then switch to white yarn for the egg white, finishing with a deliberately uneven edge that mimics the natural wobble of a real fried egg.
- Yolk (yellow yarn) R1: 6sc in mr. [6]
- R2: Chain 1, work 6 increases. [12]
- R3: Chain 1, work 12 single crochets. Do not cut the yellow yarn yet. [12]
- Change to white yarn: insert your hook into the last stitch of the yellow round, yarn over with white, and pull through to complete the stitch. Cut the yellow yarn and weave in that end later.
- R4: Chain 1. Work in the Back Loop Only (BLO). Work an increase in every stitch around. [24]
- R5: Chain 1. Work 24 single crochets around. [24]
- R6: Chain 1. Work this wobbly-edge sequence: (1hdc, 1hdc increase) twice, 8sc, (1dc, 1dc increase) three times, 3sc, 1hdc, 1hdc increase, 1 slip stitch. [30]
Cut the white yarn, leaving a tail, and weave in every end on the back of the egg to keep the front clean. You can attach a keychain ring directly to the top of the egg white through a sturdy stitch.
| Round | Instructions | Stitch Count |
|---|---|---|
| R1 (yellow) | 6sc in mr | 6 |
| R2 (yellow) | 6inc | 12 |
| R3 (yellow) | 12sc | 12 |
| R4 (white) | BLO, 12inc | 24 |
| R5 (white) | 24sc | 24 |
| R6 (white) | (1hdc,1hdc inc)×2, 8sc, (1dc,1dc inc)×3, 3sc, 1hdc, 1hdc inc, 1slst | 30 |
Swipe the table sideways to see every column.
Pretzel
The pretzel is mostly a long, patient tube that you shape at the very end. Use dark brown yarn for the whole piece. This is the slowest of the five patterns, but the shaping step at the end is quick and genuinely fun.
- R1: 6sc in mr. [6]
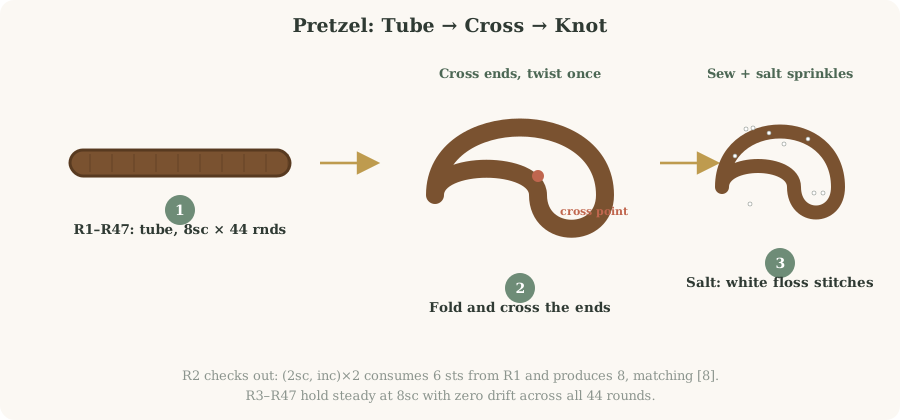
- R2: (2sc, increase) twice around. [8]
- R3: 8sc around. [8]
- R4–R47: 8sc around, repeated for 44 rounds. This builds the long, thin tube. [8]
Shaping the Pretzel
Once your tube is finished, cut the yarn, leaving a long tail, and thread it onto a darning needle. Sew the open end of the tube closed. Take the tube and cross the two ends over each other to form a loop. Twist the crossed ends one more time and press them down onto the bottom of the loop — this is the classic pretzel shape. Use your yarn tails to sew the crossed section securely to the bottom loop. Finally, take white yarn or embroidery floss and make small straight stitches all over the surface to look like salt.
| Round | Instructions | Stitch Count |
|---|---|---|
| R1 | 6sc in mr | 6 |
| R2 | (2sc, inc)×2 | 8 |
| R3 | 8sc | 8 |
| R4–R47 | 8sc (44 rounds) | 8 |
Swipe the table sideways to see every column.
Chocolate Chip Cookie
The cookie is built from two flat, identical circles sewn together with a little stuffing between them. Use light brown yarn for the cookie body and dark brown yarn for the chips.
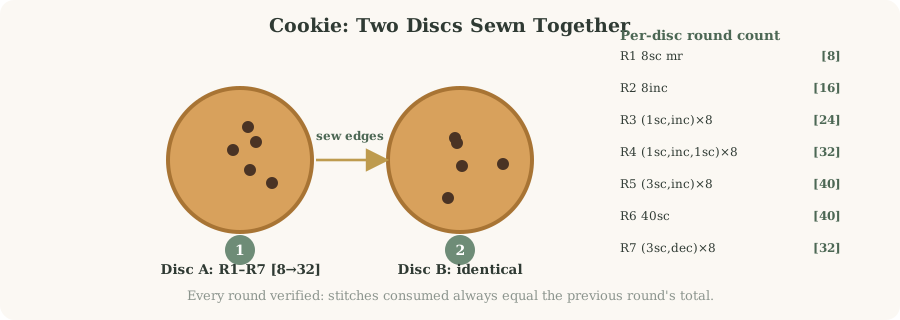
- R1: 8sc in mr. [8]
- R2: 8 increases around. [16]
- R3: (1sc, increase) around, 8 times. [24]
- R4: (1sc, increase, 1sc) around, 8 times. [32]
- R5: (3sc, increase) around, 8 times. [40]
- R6: 40sc around. [40]
- R7: (3sc, decrease) around, 8 times. [32]
Make two identical circles using the pattern above. Cut the yarn on both, leaving long tails for sewing.
Adding the Chocolate Chips
Before you sew the two circles completely shut, add a small amount of stuffing between them. Then take dark brown yarn and a darning needle and make several small straight stitches or French knots on the surface to represent chocolate chips — distribute them randomly across both sides for a natural look. Finish sewing the two circles together and weave in the remaining ends.
| Round | Instructions | Stitch Count |
|---|---|---|
| R1 | 8sc in mr | 8 |
| R2 | 8inc | 16 |
| R3 | (1sc, inc)×8 | 24 |
| R4 | (1sc, inc, 1sc)×8 | 32 |
| R5 | (3sc, inc)×8 | 40 |
| R6 | 40sc | 40 |
| R7 | (3sc, dec)×8 | 32 |
Swipe the table sideways to see every column.
Toast
The toast is worked in rows rather than rounds, which builds a flat square shape instead of a circle. Start with white yarn for the bread, then switch to brown yarn for the crust border.
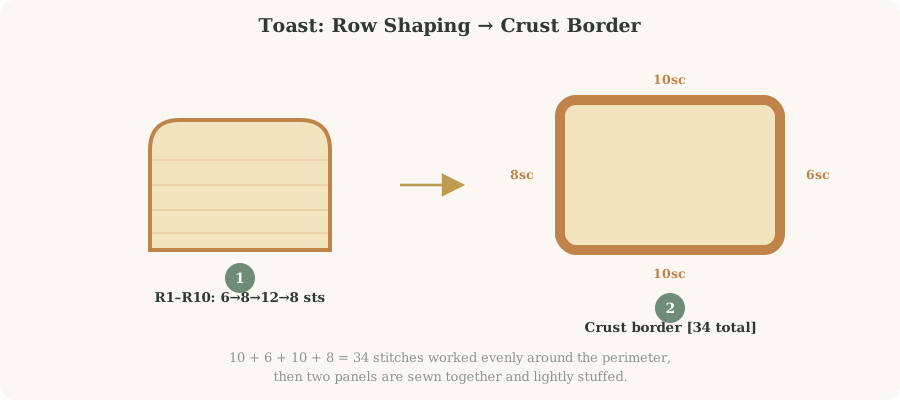
- White yarn: chain 7. R1: 6sc in the second chain from the hook, and across. [6]
- R2: Chain 1, turn, 6sc. [6]
- R3–R4: Chain 1, turn, 6sc, for 2 rows. [6]
- R5: Chain 1, turn, 1 increase, 4sc, 1 increase. [8]
- R6: Chain 1, turn, 8sc. [8]
- R7: Chain 1, turn, 1 increase, 6sc, 1 increase. [10]
- R8: Chain 1, turn, 1 increase, 8sc, 1 increase. [12]
- R9: Chain 1, turn, 1 decrease, 8sc, 1 decrease. [10]
- R10: Chain 1, turn, 1 decrease, 6sc, 1 decrease. [8]
Adding the Crust
With brown yarn attached, work single crochet evenly around the entire edge of the toast piece: 10sc along the first side, 6sc along the second side, 10sc along the third side, and 8sc along the fourth side. [34 total]. Make two identical toast pieces this way. Place them together with the wrong sides facing each other, sew around the edges with brown yarn while leaving a small gap, stuff lightly with polyfill, then sew the gap closed.
| Row | Instructions | Stitch Count |
|---|---|---|
| R1 | 6sc | 6 |
| R2 | Ch1, turn, 6sc | 6 |
| R3–R4 | Ch1, turn, 6sc | 6 |
| R5 | Ch1, turn, 1inc, 4sc, 1inc | 8 |
| R6 | Ch1, turn, 8sc | 8 |
| R7 | Ch1, turn, 1inc, 6sc, 1inc | 10 |
| R8 | Ch1, turn, 1inc, 8sc, 1inc | 12 |
| R9 | Ch1, turn, 1dec, 8sc, 1dec | 10 |
| R10 | Ch1, turn, 1dec, 6sc, 1dec | 8 |
| Crust border | 10sc + 6sc + 10sc + 8sc around all four sides | 34 |
Swipe the table sideways to see every column.
Finishing & Attaching Hardware
Once your miniature breakfast items are complete, the last step is turning each one into an actual keychain.
- Attaching rings: use a small split ring or jump ring. For the toast and cookie, sew a small yarn loop to the top and attach the ring to that loop. For the croissant and pretzel, you can attach the ring directly to the yarn tails used to sew the ends together.
- Reinforcing the loop: if the piece will see daily use on a keyring, take two or three passes of yarn through the same anchor point before attaching the hardware. A single strand tears out under repeated tugging.
- Cleaning: these items are small and collect dust easily. Use a piece of sticky tape to gently lift dust off the surface. Do not machine wash them — agitation can distort the shape and clump the stuffing.
- Storage: keep finished pieces in a small bag or box when not in use so they do not get crushed inside a backpack.
Troubleshooting
If you run into trouble while making your breakfast keychains, check this table for the most common problems.
| Problem | Cause | Solution |
|---|---|---|
| Gaps between stitches | Hook is too large for the yarn | Switch to a smaller hook (2.5mm) or pull your yarn a little tighter |
| Circle is curling up | Too many increases in the early rounds | Frog back to R2 and check your count — it should be exactly double R1 |
| Stuffing looks lumpy | Using large chunks of polyfill | Pull the stuffing apart into small wisps before pushing it inside |
| Color change has a hole | Not pulling the new yarn tight enough | Pull the new color firmly on the first stitch to close the gap |
| Toast border looks wavy | Too many stitches worked into the border round | Skip a stitch here and there around the border to keep the edge flat |
| Round count is off by one or two | A missed or doubled stitch several rounds back | Count stitches every 2–3 rounds instead of only at the end — catching drift early saves a full frog-back |
Swipe the table sideways to see every column.
Frequently Asked Questions About Crochet Breakfast Keychains
Can I use a different size hook?
How do I attach the keychain hardware securely?
Can I wash these if they get dirty?
What yarn is best for a beginner making these?
How long does each keychain take to make?
Why does my stitch count not match the pattern?
Can I make these bigger, as ornaments instead of keychains?
Do I need stitch markers for these patterns?
You Did It!
Five miniature breakfast items, five different construction techniques, and a stack of yarn scraps put to good use. Whether you are gifting these or keeping the whole set for your own keys, you now have a tiny bakery counter’s worth of amigurumi to show for an afternoon of crochet.
Your quick-start checklist:
- Weave in every loose yarn end securely, especially at color changes.
- Check that stuffing is distributed evenly, with no lumps or bare spots.
- Attach keychain hardware to a sturdy, reinforced yarn loop, not a single stitch.
- Add final details — eyeshadow shading, embroidered icing, salt stitches — last, after stuffing.
- Photograph your finished breakfast set before it disappears onto everyone’s keys.
Ready for your next project?
If you enjoyed this set, try the crochet heart keychain tutorial next — same 3mm-hook scale, a completely different shaping technique.
Tell us in the comments which of the five you made first, and how long the pretzel tube actually took you.