
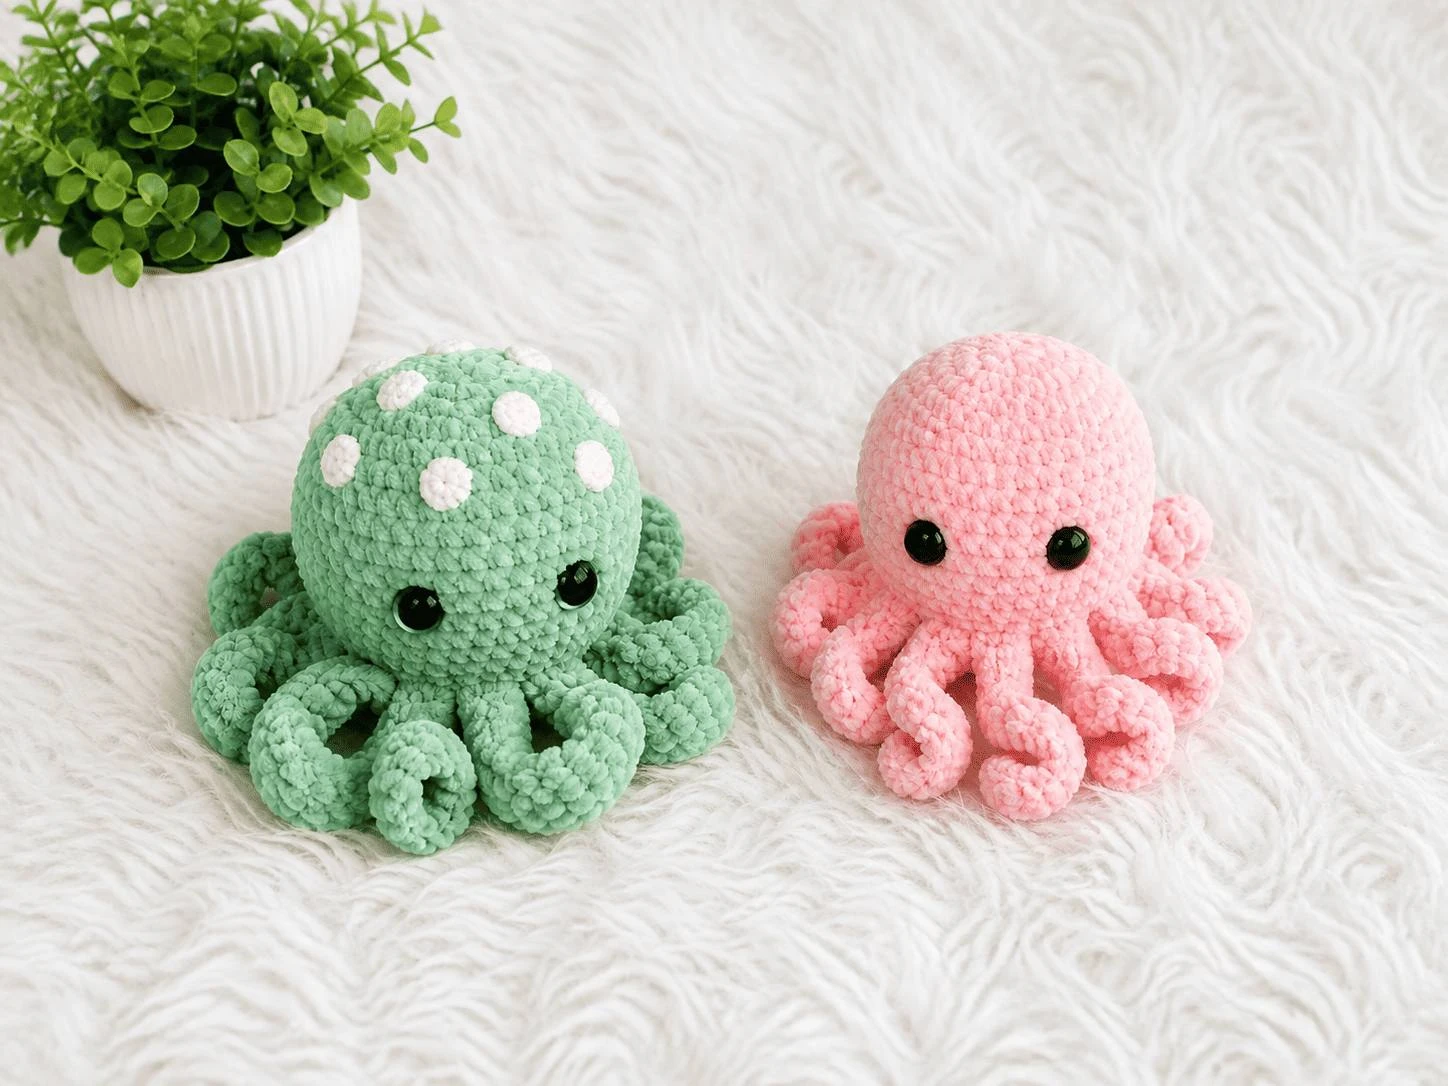
Tiny Crochet Octopus: A Calm, Round-by-Round Pattern for Your First Amigurumi
Some evenings ask for a small, quiet make — something that fits in the palm of your hand and asks very little of you except slow, repetitive stitches. This tiny crochet octopus is exactly that kind of project: a round little head, a frilly skirt of legs, two stitched eyes, and suddenly there is a companion sitting warm against your palm.
If the idea of counting rounds makes your shoulders tense, take a breath. This pattern is taught at a genuinely gentle pace, with the magic ring shown more than once, from more than one angle, so your hands can copy along exactly.
Every step below is translated into a written pattern with exact, hand-checked stitch counts, fresh diagrams, fixes for the usual stumbling blocks, and the little reminders that make the difference between a lumpy first try and a tidy one — like the very insistent nudge to add your stitch marker before you forget.
Put the kettle on. Your octopus is waiting.
What This Crochet Octopus Tutorial Makes
This is a palm-sized amigurumi octopus worked from the top of the head down to a ruffled hem of six scalloped “legs.” It uses soft 5-ply milk cotton yarn in a small, warm colour of your choosing, and there is an optional strawberry variation that wears a little six-point leaf on its head. Everything relies on a handful of basic skills: the magic ring, single crochet, half double crochet, chain, slip stitch, increases and decreases — nothing more exotic than that.
- Finished size: roughly 4–5 cm (about 2 in) tall with 5-ply milk cotton and a 3 mm hook — a true pocket toy.
- Shape: a round domed head that cups, closes and stuffs, finished with a frilly scalloped brim instead of separate legs.
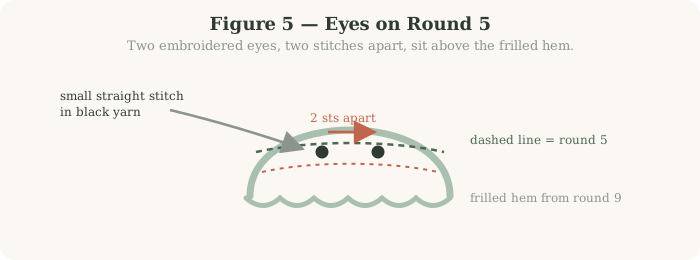
- Face: two embroidered eyes in black yarn, placed on round 5, two stitches apart — no safety eyes needed, so it is baby-safe.
- Bonus make: a six-pointed green leaf that turns a plain octopus into a strawberry.
- Construction: joined rounds (chain 1, work, slip stitch to close), with a stitch marker moved up every round.
- Skill level: first-amigurumi friendly. If you can single crochet, every other move in this pattern is walked through slowly.
Materials & Tools for Your Crochet Octopus
The whole project uses scraps — this is a perfect stash-diet make. Any smooth milk cotton behaves the same way from one skein to the next.
| Item | What to use | Notes |
|---|---|---|
| Body yarn | 5-ply milk cotton, one small skein | About 5–8 g per octopus; one 50 g ball makes a whole shelf of them |
| Extra colours | Black for the eyes; a second shade + green for the strawberry version | Scraps are plenty |
| Hook | 3 mm | Use a hook that gives you a tight, closed fabric |
| Stitch marker | One locking marker | A safety pin or a bit of contrast yarn works too |
| Darning needle | Fine steel needle | For the eyes and closing the base |
| Stuffing | White fibre fill | Or scrap yarn, shown below as a second option |
| Scissors | Small, sharp pair | — |
| Optional | All-purpose fabric glue | Only for attaching the leaf topper |
Swipe the table sideways to see every column.
How to Start a Crochet Octopus: The Magic Ring, Done Slowly
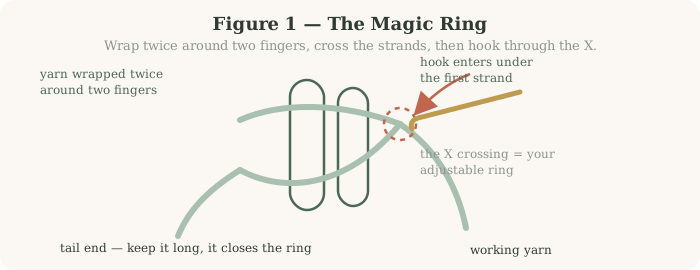
Every octopus and every leaf in this pattern begins with a magic ring (also called a magic loop or adjustable ring). It is the one move that scares new crocheters, and it rewards a slow, deliberate first attempt. The ring gives you a centre hole that pulls completely shut — no gap, no lumpy chain knot in the middle of your octopus’s head.
- Leave a tail. Pull out about 15 cm (6 in) of yarn before you begin. This short tail is what tightens the ring later, so never start with a stub.
- Drape the yarn over your fingers. Lay the tail across your palm and wrap the working yarn twice around your index and middle fingers.
- Cross the strands. Bring the working yarn over the top of the first strand on the palm side, forming an X. That cross is the “magic” part — it is what locks the loop.
- Insert the hook. Slide the hook under the first strand and over the second, hook tip pointing toward the working yarn.
- Yarn over and pull through. Catch the working yarn and draw it back under the strands. You now hold a loop on the hook.
- Chain 1 to secure the ring. This chain does not count as a stitch.
- Slide the ring off your fingers, pinching the crossing point between thumb and finger so nothing unravels before round 1 begins.
Round 1: Six Single Crochet Into the Ring
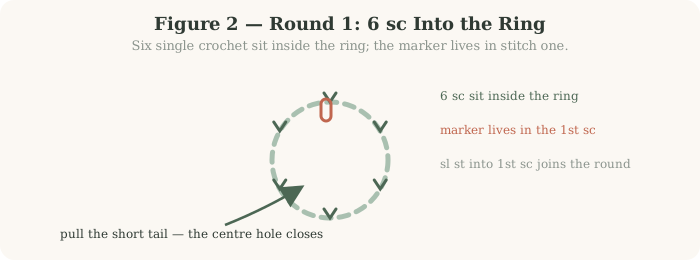
With the ring secured, work round 1 — 6 single crochet. Each stitch goes straight into the ring, over both strands of the loop, worked slowly and deliberately.
- Insert the hook into the ring, catching both yarn strands, and yarn over.
- Pull up a loop so you have two loops on the hook.
- Yarn over and pull through both loops. That is your first single crochet — put the stitch marker in it right now, not later.
- Repeat until you count 6 single crochet in total, counting out loud as you go.
- Pull the tail end to cinch the ring. Watch the hole shrink to nothing; this moment never gets old.
- Join with a slip stitch into the marked first stitch to close round 1 into a neat circle.
Shaping the Head: Increases That Keep Your Crochet Octopus Round
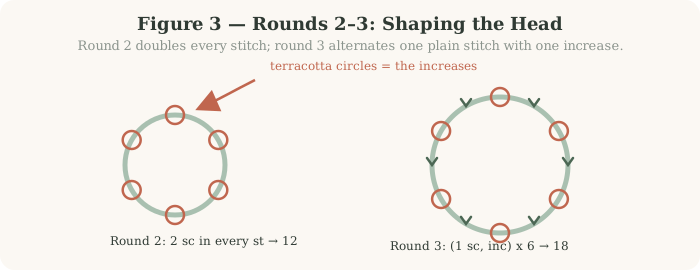
An amigurumi head is just a flat circle that is told to become a sphere, and increases are how you give the orders. An increase means working two single crochet into the same stitch.
- Round 2: chain 1, then work 2 single crochet into every stitch around. 6 stitches become 12. Join with a slip stitch.
- Round 3: chain 1, then repeat (1 single crochet, 1 increase) six times. 12 stitches become 18. Join with a slip stitch.
- Move the marker into the first stitch of each new round as you go, every single round, no exceptions.
- Flatten the disc between your fingers now and then. After round 3 it should lie like a little pancake, not a bowl.
Rounds 4–7: The Body Grows Into a Little Cup
Now the pattern settles into its soothing part — four identical rounds of one single crochet in each stitch, joined with a slip stitch each time. With no increases to add, the flat disc has nowhere to go but up, and it curls into a perfect little cup: the future head of your crochet octopus.
- Chain 1, then work 18 single crochet, one in each stitch around.
- Join with a slip stitch into the first stitch and move your marker up.
- Repeat until you have completed rounds 4, 5, 6 and 7 — four rounds of 18 stitches.
- Pause and admire: the piece should now stand up like a tiny thimble on your fingertip.
Closing Up: Decreases, Stuffing & Finishing Your Crochet Octopus
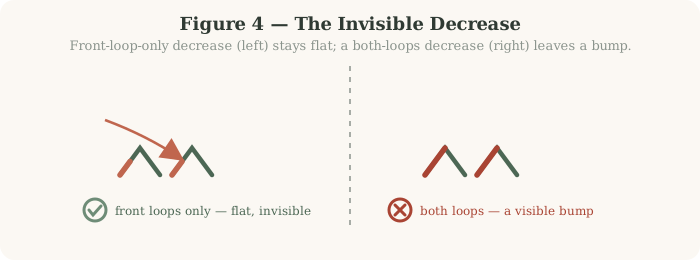
Round 8 mirrors round 3 in reverse: (single crochet, decrease) x 6, taking you from 18 stitches down to 12. Use the invisible decrease, which works through the front loops only and leaves no lumpy knots on the outside of the head — the difference between a smooth octopus and a bumpy one.
The invisible decrease, step by step
- Insert the hook into the front loop only of the next stitch, then straight into the front loop only of the stitch after it. Two front loops sit on the hook.
- Yarn over and pull through both front loops.
- Yarn over and pull through the two loops on the hook to finish, exactly like the top of a normal single crochet.
- Alternate one plain single crochet with one decrease, six times around, then join with a slip stitch.
Eyes on round 5, two stitches apart
With a darning needle and black yarn, embroider each eye as a small straight stitch over one stitch bar, placed on round 5 with two stitches between the eyes. Sew the eyes before stuffing if you can — an empty head is far easier to needle through. Bury both tails inside the body and snip them short.
Closing the base
After the final round, thread the yarn tail and weave it in and out of the last round’s stitches, then cinch the opening shut and knot the tail on the inside. A neat running stitch around the base works just as well; either method hides completely once the frill is facing the world.
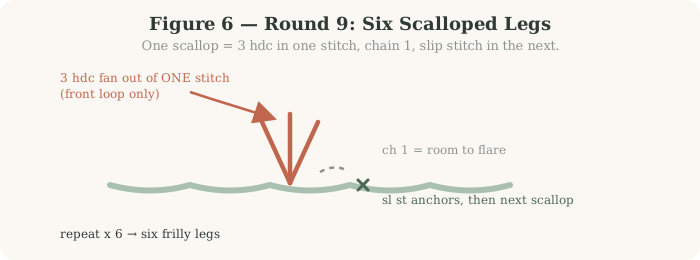
Six Scalloped Legs: The Frilly Bit Everyone Loves
The signature detail of this crochet octopus is its hem. Round 9 reads “(3 half double crochet, chain 1, slip stitch) x 6.” Each repeat builds one flared scallop — three half double crochets fanning out of a single stitch — and the chain 1 gives the frill room to flare instead of ruffling flat. Work into the front loop only for a cleaner edge.
- Yarn over, insert into the next stitch (front loop only), yarn over, pull through, then yarn over and pull through all three loops on the hook. That is one half double crochet.
- Make 3 half double crochet in total into the same stitch. Watch them fan out like a tiny skirt panel.
- Chain 1, then anchor the scallop with a slip stitch into the next stitch.
- Repeat six times around. Six scallops, six little legs, one very smug octopus.
- Fasten off, leaving a tail for closing and sewing.
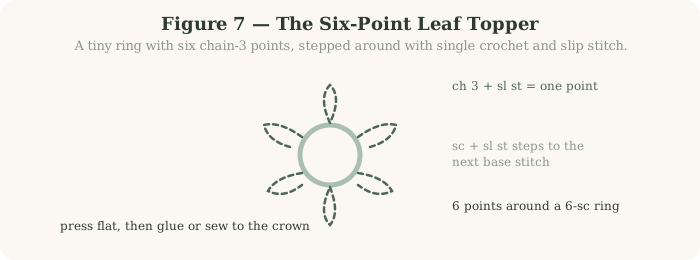
Optional: The Little Green Leaf Topper
For a strawberry-style octopus, crochet a star-shaped leaf in green and glue it to the top of a light-coloured body. The leaf starts with its own magic ring, worked into 6 single crochet, then the point repeat “(chain 3, slip stitch, single crochet, slip stitch) x 6.” Each repeat raises one pointy tip and steps you along to the next base stitch.
- Magic ring in green, then work 6 single crochet into it and pull the tail closed.
- Make the points: repeat (chain 3, slip stitch, single crochet, slip stitch) around — six little spikes that read as a leaf.
- Fasten off, leaving a short tail, and press the leaf flat between your fingers.
- Attach with a small dot of all-purpose glue on the crown of the head, or take a few hidden stitches with the tail if you prefer sewing.
Crochet Octopus Pattern at a Glance
Pin this table next to your yarn bowl. Abbreviations: sc single crochet, hdc half double crochet, ch chain, sl st slip stitch, inc increase (2 sc in one stitch), dec invisible decrease.
| Round | Instructions | Stitches at end |
|---|---|---|
| 1 | Magic ring, 6 sc, pull tail, sl st to join | 6 |
| 2 | Ch 1, inc in every st (6 inc), sl st | 12 |
| 3 | Ch 1, (sc, inc) x 6, sl st | 18 |
| 4–7 | Ch 1, 18 sc, sl st — four identical rounds | 18 |
| 8 | Ch 1, (sc, dec) x 6, sl st — stuff after this round | 12 |
| 9 | (3 hdc in one st, ch 1, sl st in next st) x 6, fasten off | 6 scallops |
| Face | Embroider eyes on round 5, two stitches apart | — |
| Leaf | Magic ring, 6 sc; (ch 3, sl st, sc, sl st) around; fasten off | 6 points |
Swipe the table sideways to see every column.
Finishing & Caring for Your Tiny Crochet Octopus
- Weave ends in three directions so a well-loved octopus can never pull a tail loose. Milk cotton ends flatten and hide beautifully.
- Wash by hand in cool water with a drop of mild soap. Press — never wring — in a towel, reshape the head and frill, and dry flat.
- Revive the frill after washing by gently fanning each scallop open with your fingers while damp.
- Gift wisely: embroidered eyes and scrap-yarn stuffing make this a safe little companion for small hands; skip the glued leaf for babies and sew it instead.
- Squeeze daily. This is not optional. It is what the octopus was born for.
Troubleshooting: Quick Fixes for Common Wobbles
| Problem | Likely cause | Fix |
|---|---|---|
| Centre hole won’t close after round 1 | Pulling the working yarn instead of the tail | Tug the short tail end; the ring cinches shut like a drawstring bag |
| Disc cups into a bowl on rounds 2–3 | Tight tension or a missed increase | Count stitches (12, then 18), relax your grip, flatten the disc with your fingers |
| A little step at every join | Normal for joined rounds | It softens after stuffing; or try spiral rounds once you’re confident |
| Decrease round looks lumpy | Decreasing through both loops | Switch to the invisible decrease through front loops only (Figure 4) |
| Frill won’t flare | Skipped chain 1 or tight clusters | Redo one scallop with a proper ch 1 and looser hdc; compare the difference |
| Eyes look cross-eyed or lopsided | Placing by eye instead of counting | Count from the marker: round 5, two stitches apart; unpick and reposition freely |
| Leaf points curl upward | Tight chain 3 | Work the chains loosely, press the leaf flat, or pin and steam it lightly |
Swipe the table sideways to see every column.
Crochet Octopus Questions, Answered
How big is the finished crochet octopus?
I don’t have 5-ply milk cotton. What can I use?
How long does one octopus take?
Why join with a slip stitch instead of working in a spiral?
Can I stuff it with scrap yarn instead of fibre fill?
Is this really a first-amigurumi project?
Why does my tiny crochet octopus look lopsided?
Can I make a bigger crochet octopus with the same pattern?
You Now Have a Pocket-Sized Friend
From a loop of yarn around two fingers to a frilled, stuffed, wide-eyed little octopus — that is the whole magic trick, and you just learned every part of it. Run the checklist one last time:
- Magic ring closed tight, 6 sc counted and marked in round 1.
- Increases on rounds 2–3 lie flat: 12, then 18 stitches.
- Four even rounds of 18 sc built the cup; marker moved up every round.
- Round 8 decreased to 12 with invisible, bump-free decreases.
- Eyes embroidered on round 5, two stitches apart, tails buried.
- Stuffed firmly, base cinched or sewn shut, ends woven in.
- Six scalloped legs flaring from round 9 — and maybe a leaf on a strawberry twin.
Make one in blue, one in pink, then a whole jar of them. Small hooks, slow stitches, and a soft little octopus at the end — that is a very good evening.
One Octopus Is Never Enough
Save this pattern for your next quiet evening, or send it to the friend who keeps saying they want to learn crochet. If you enjoyed this beginner amigurumi octopus pattern, you will also like our crochet black cat plushie for another small, huggable make.
One Comment