How to Crochet a Ribbed Beanie (No Bunch Method!)
You know the hat. The one with a proud little topknot of gathered fabric at the crown, where decrease rounds pulled six stitches into one spot and refused to lie flat. You have made that hat, maybe more than once, and you still tug it down self-consciously every time you catch your reflection.
A crochet ribbed beanie made with the no bunch method skips that problem entirely. No decrease round to fight, no counting down from twelve stitches to three. You work flat, straight rows the whole way, and the shaping happens almost by accident, built into a stitch pattern that quietly narrows one edge as you go.
The trick is a back loop only ribbing worked in half double crochet and slip stitch, seamed into a tube, then gathered shut with a threaded tail. It looks like it came off a knitting machine. It did not.
Grab worsted weight yarn and a 5mm hook. You will learn exactly how to size this for a newborn, a child, or yourself, and exactly why that slip-stitch edge does all the hard work for you.
What Is a No-Bunch Ribbed Beanie?
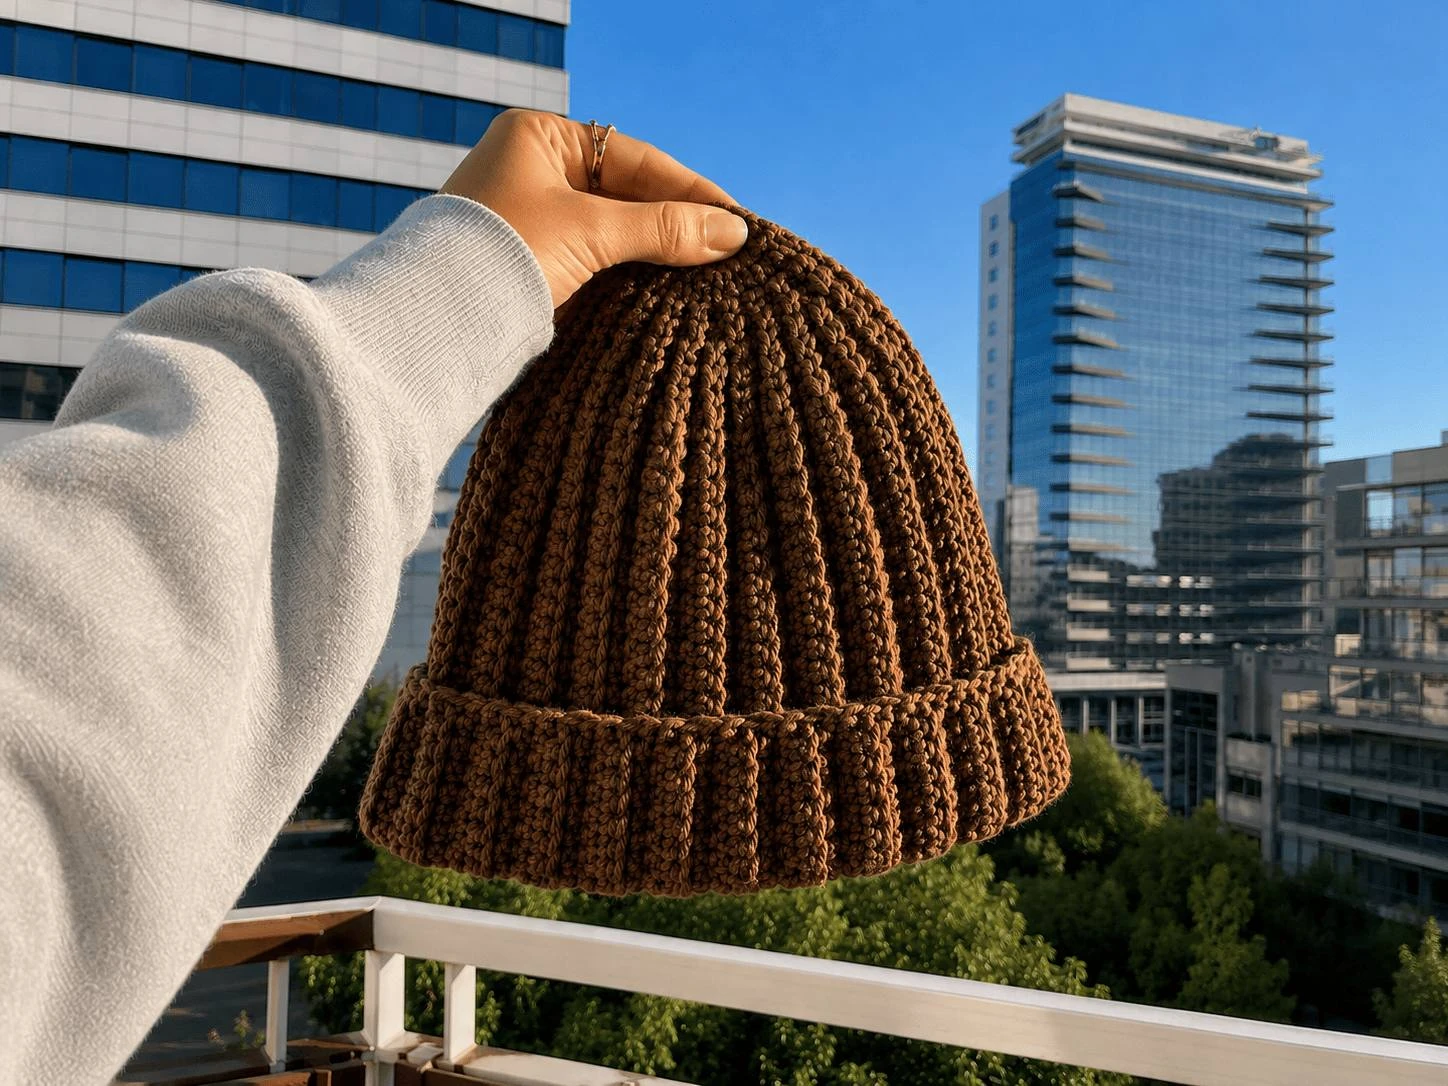
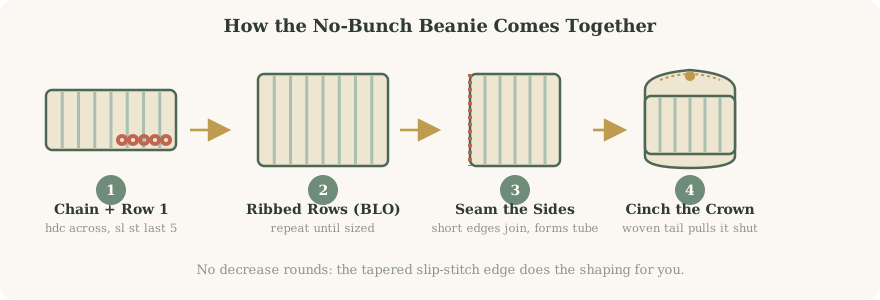
A no-bunch ribbed beanie is a winter hat built from a single flat rectangle of half double crochet and slip stitch, worked entirely in the back loop only so the fabric develops a stretchy, horizontal rib that behaves like knitting. Instead of crocheting in the round and decreasing at the crown, you crochet flat, seam the short edges into a tube, then close the top by weaving a tail through the tapered slip-stitch edge. No decrease round means no bulky gathered point at the crown.
It sounds like a shortcut, and in a sense it is, but the construction is doing something clever rather than skipping a step. Every row ends with five slip stitches instead of five more half double crochets, and slip stitches sit shorter. Repeat that across twenty-some rows and one edge of your rectangle quietly ends up narrower than the other, long before you pick up a needle.
Why This Pattern Works So Well for Beginners
- Only two stitches to learn: half double crochet and slip stitch.
- No decrease round — the same row structure runs start to finish.
- Back loop only is forgiving; a missed loop shows up as a broken ridge.
- One hook-size decision governs the whole project.
- The flat shape lets you try it on for size before seaming.
Materials and Tools
This is a low-commitment stash project. You need one main skein, one hook, and the notions already living in your project bag.
| Item | Specification | Notes |
|---|---|---|
| Yarn | Worsted weight (Craft Yarn Council #4) | Acrylic, wool, or a wool blend, about 100-150g depending on size |
| Crochet hook | 5mm (US H/8) | Produces a balanced, stretchy fabric at this weight |
| Tapestry needle | Large eye, blunt tip | For weaving ends and cinching the crown |
| Scissors | Sharp, small | Clean cuts keep the tail from fraying while you weave it |
| Stitch marker | Any style | Optional, but useful for flagging row 1 so you never lose your place |
Swipe the table sideways to see every column.
Yarn weight matters more than brand here. If yarn weight labels confuse you, the Craft Yarn Council’s standard yarn weight system is the reference the whole industry uses. Worsted weight is category 4.
Stitches and Abbreviations You Will Use
| Abbreviation | Stitch | What It Does Here |
|---|---|---|
| ch | Chain | Builds the foundation row and the turning chain |
| hdc | Half double crochet | The main body stitch — taller than single crochet, shorter than double |
| sl st | Slip stitch | Worked at the end of every row; shorter than hdc, which creates the taper |
| BLO | Back loop only | Insert the hook under only the back strand of the stitch, leaving the front loop free |
| st(s) | Stitch(es) | General reference to a stitch or group of stitches |
| rep | Repeat | Work the same sequence again as instructed |
Swipe the table sideways to see every column.
The One Technique to Really Learn: Back Loop Only
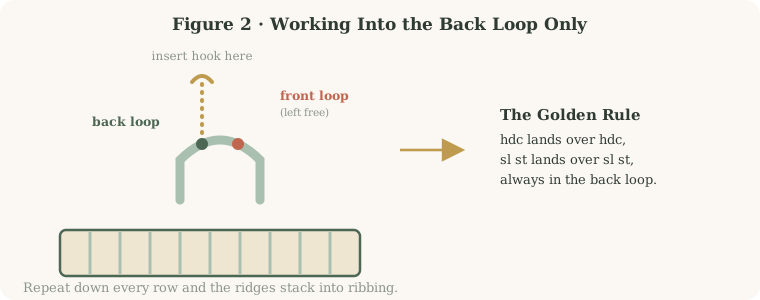
Every stitch has two loops at its top, forming a small V. The loop closest to you is the front loop; the one farther away is the back loop. Working BLO means sliding your hook under just that far strand and leaving the near one untouched. That skipped loop stacks row after row into the raised ridge that makes this beanie look ribbed.
Sizing the Beanie for Any Head
This pattern scales with two numbers: your starting chain (the circumference once seamed) and your row count (the height, brim to crown). Get those right, and everything else stays the same.
- Measure head circumference at the widest point, about one inch above the eyebrows and ears.
- Subtract for negative ease. BLO ribbing stretches, so subtract 1-2 inches so the hat hugs rather than slides.
- Convert to a chain count. Each stitch measures roughly 0.45-0.48 inches wide; divide your eased circumference by that number, then add 6 (5 for the taper, 1 for the turning chain) for your starting chain.
- Measure desired height. Brim to crown runs 8-10 inches for an adult, 7-8 inches for a child, 5-6 inches for an infant.
- Work rows until you hit that height, checking against a tape measure every few rows rather than guessing.
If you would rather skip the math, these three reference sizes cover most heads and were the sizes used to spot-check the chain-to-stitch-count logic in this pattern:
| Size | Starting Chain | Stitch Count (hdc + sl st) | Target Height (Rows) | Finished Circumference |
|---|---|---|---|---|
| Newborn | 30 | 24 hdc + 5 sl st = 29 sts | 12-14 rows | ~13 inches |
| Child | 38 | 32 hdc + 5 sl st = 37 sts | 16-18 rows | ~17-18 inches |
| Adult | 45 | 39 hdc + 5 sl st = 44 sts | 20-24 rows | ~20-21 inches |
Swipe the table sideways to see every column.
Crocheting the Beanie, Start to Finish
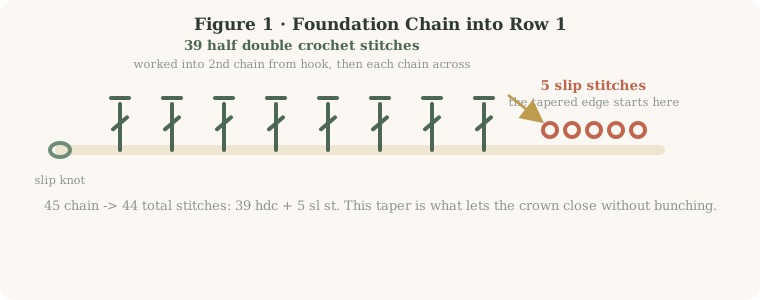
Step 1 · The Foundation and First Row
The foundation chain sets your circumference; Row 1 builds the tapered edge that later closes the crown.
- Make a slip knot and place it on your 5mm hook.
- Chain to your size (45 for an average adult head — see the sizing table above to adjust).
- Yarn over and work one half double crochet into the second chain from the hook.
- Continue working one hdc into each chain across until exactly five chains remain.
- Work one slip stitch into each of the last five chains.
Step 2 · Building the Ribbed Rows
Every row after Row 1 repeats one idea: match the stitch below, worked into the back loop only.
- Chain 1 and turn. This chain 1 does not count as a stitch.
- Find the back loop of the first stitch — the loop farther from you in the V at the top of the stitch.
- Match the stitch type: hdc into the back loop of an hdc below, sl st into the back loop of a sl st below.
- Repeat across the row, always matching stitch-for-stitch with the row underneath.
- Count your stitches. You should still have your full total (44 for adult sizing) at the end of every row.
Keep repeating Row 2 until your rectangle measures the target height. Check the chain-length edge periodically too, since a piece stretched while you work can quietly grow narrower than intended.
Step 3 · Seaming the Sides Into a Tube
Once your rectangle is the right height, join its two short SIDE edges — not the top and bottom — to form the tube.
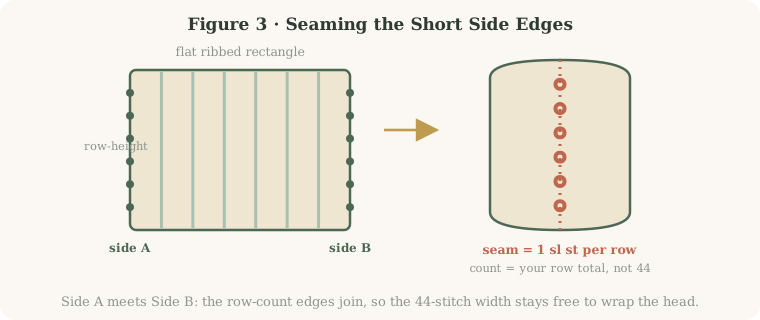
- Line up the two short side edges, right sides together, matching row for row.
- Insert your hook through the corresponding edge stitch on both layers at once.
- Yarn over and pull through all loops to make a slip stitch, joining that row.
- Work one slip stitch per row down the whole edge — your total equals your row count (about 20-24 for adult), not the 44-stitch row width.
- Fasten off and weave the short tail into the seam to hide it.
Step 4 · Closing the Crown (The No-Bunch Method)
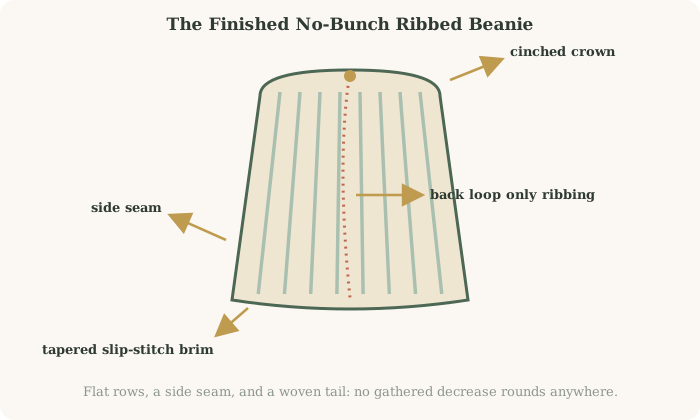
This is the payoff. Because every row ended in five short slip stitches instead of five more hdc, that edge of your tube sits narrower than the hdc edge. The built-in taper closes the top smoothly, no gathered decreases needed.
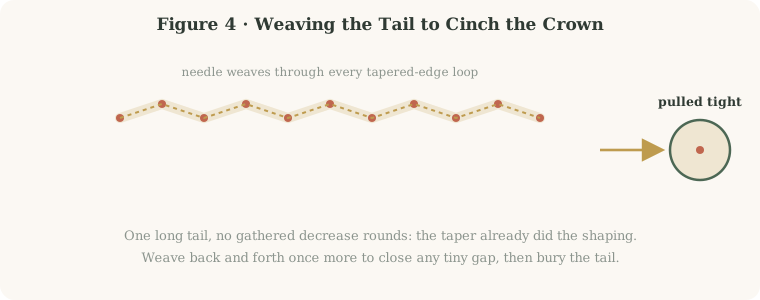
- Cut a tail roughly 18-24 inches and thread it onto your tapestry needle.
- Weave the needle in and out of the loops along the tapered top edge, all the way around.
- Back at your start, pull the tail gently but firmly. The top cinches closed.
- If a small hole remains, weave back and forth across it a few times, pulling snug.
- Weave the remaining tail into the inside of the hat and trim.
Step 5 · Finishing and Care
- Weave in every remaining tail through the inside ridges, changing direction twice so nothing slips loose.
- If the ribbing looks uneven, mist lightly with water, stretch into a uniform cylinder, and lay flat to dry.
- Hand wash in cool water with mild detergent as needed; lay flat and avoid wringing.
Troubleshooting, Variations, and Planning Your Time
| Problem | Likely Cause | Fix |
|---|---|---|
| Hat is too tight | Chain worked too tightly or hook runs small | Go up one hook size for the foundation chain only, then switch back |
| Top hole will not close | Too few rows, or tail cut too short | Add 2 more rows, and leave a full 24-inch tail for cinching |
| Ribbing looks slanted | Missed stitch at a row edge, uneven tension | Count stitches every row; mark Row 1 with a stitch marker |
| Seam feels stiff | Slip stitches worked too tightly | Loosen tension, or mattress-stitch the seam instead |
Swipe the table sideways to see every column.
Variations Worth Trying
- Add a folded brim: work 4-6 extra rows and turn them up before seaming.
- Stripe the ribbing every 4-6 rows — the ridges show off color changes cleanly.
- Swap worsted for chunky (5) yarn with a 6mm hook for a faster, cozier version.
- Add a pompom or small crocheted flower at the crown once the cinch is complete.
| Size | Approx. Time to Crochet | Care |
|---|---|---|
| Newborn | 45-60 minutes | Hand wash cool, lay flat |
| Child | 1.5-2 hours | Machine wash gentle if acrylic, hand wash if wool |
| Adult | 2-3 hours | Hand wash cool, lay flat, avoid wringing |
Swipe the table sideways to see every column.
Frequently Asked Questions About the No-Bunch Ribbed Beanie
Can I make this beanie for a baby?
What yarn is best for this project?
Why do I have to work in the back loop only?
How do I know when to stop adding rows?
Can I use a different hook size?
Why is the seam only counted by rows and not by 44 stitches?
My ribbing looks tighter on one side than the other. What happened?
Can I turn this same rectangle into a headband instead of a hat?
You Are Ready to Cast On
Picture that crisp morning again: hat pulled snug, ribbing hugging your head, crown lying flat with no telltale bunch at the top. That is the beanie you are about to make, built from nothing more exotic than half double crochet, slip stitch, and a stitch pattern that tapers itself.
Your quick-start checklist:
- Gather worsted weight yarn and a 5mm hook.
- Chain to your size — 30 for newborn, 38 for child, 45 for adult.
- Work Row 1: hdc across until 5 chains remain, then sl st the last 5.
- Repeat the BLO row pattern until you reach your target height.
- Seam the two short side edges together, one slip stitch per row.
- Weave a long tail through the tapered edge and cinch the crown shut.
Keep your tension even and your stitch counts honest at the end of every row, and this pattern will reward you with a hat that looks far harder than it was.
Made your own no-bunch beanie?
Tell us your finished circumference and row count in the comments — it helps other readers pick their starting chain faster.
Looking for a matching accessory? Try our crochet mesh hairband pattern for a lightweight companion piece.