
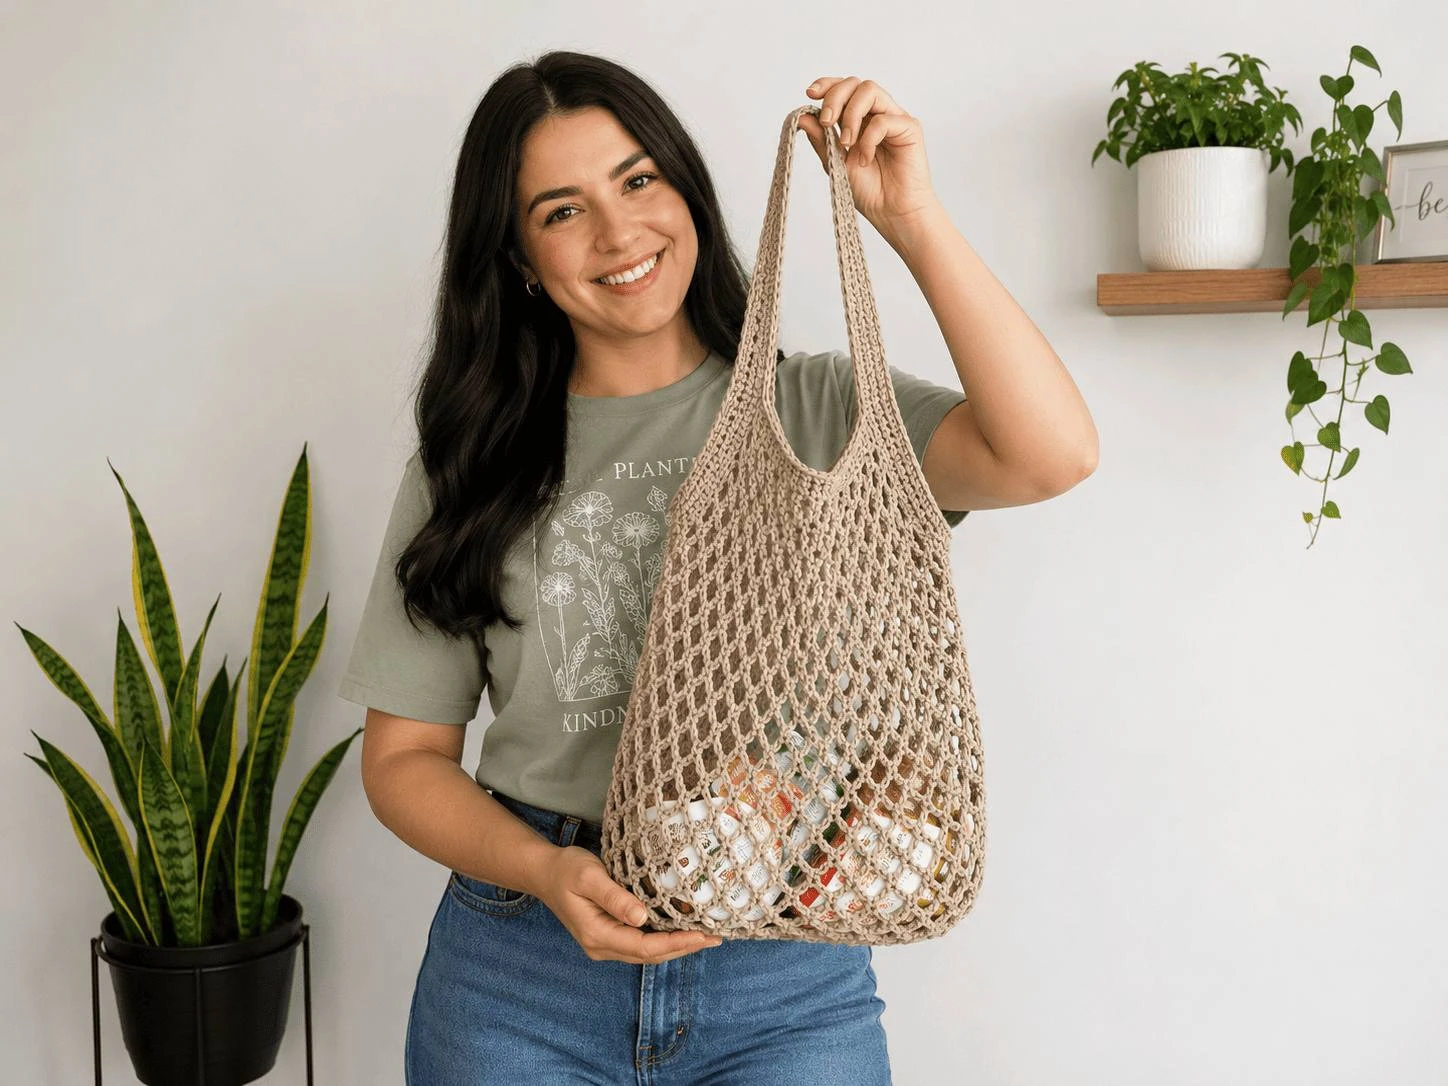
Crochet Mesh Bag Pattern: The Beginner V-Stitch Bag You Can Make Any Size
You have owned a bag that was the wrong size. Just wrong enough that the paperback sat at an angle, one corner poking out, and you carried it in your hand instead.
Shop-bought bags come in sizes somebody else chose. That is the whole problem, and it is why people pick up a hook.
This crochet mesh bag pattern hands the decision back. Chain 24 for a phone pouch. Chain 48 for a market tote. The stitches never change. Only the numbers do.
And the part that scares beginners — getting lost halfway — barely applies. The body of this bag is one stitch, repeated. Two rounds in, your hands stop needing the instructions.
What You Are Making, in One Look
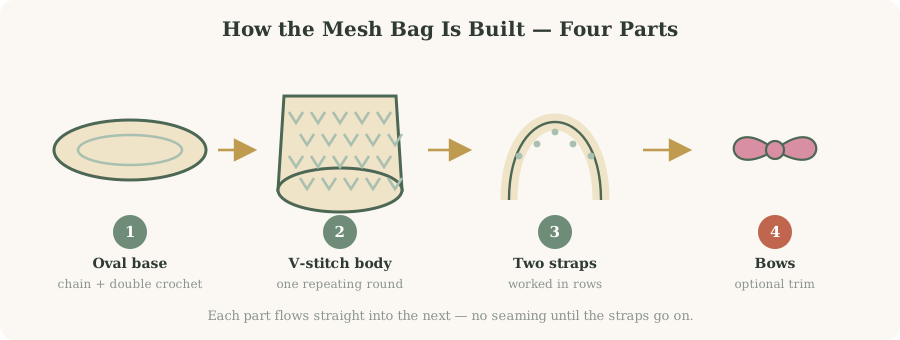
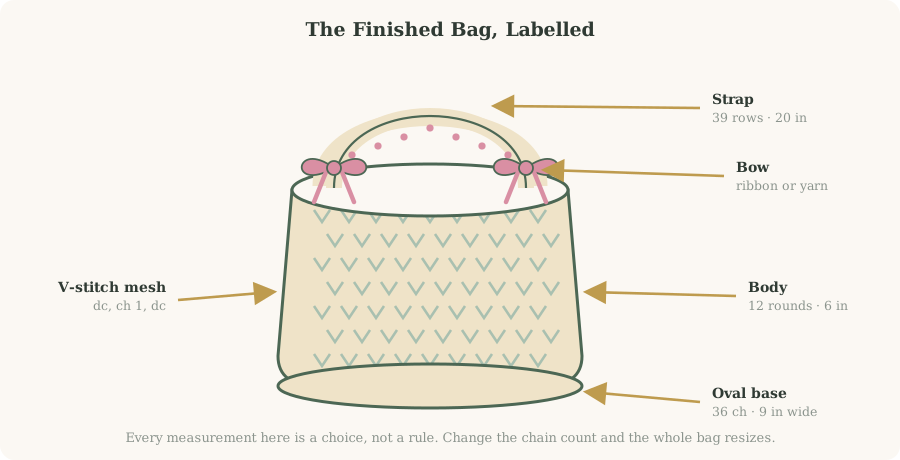
A crochet mesh bag is an open-fabric tote worked in the round, built on a flat oval base and finished with crocheted straps. The airy fabric comes from one repeating stitch called the V-stitch, which leaves a small gap between every pair of posts.
It comes together in four parts, each flowing into the next. No seaming until the straps go on.
Why This Bag Suits a Beginner
Three stitches carry the whole project. Chain, double crochet, slip stitch. Nothing else.
- One repeating round. The body is the same instruction from round two onward.
- Mesh is forgiving. Tension wobbles that would show in solid fabric disappear into the holes.
- It grows fast. Double crochet is tall, so each round covers real ground.
- Nothing is fixed. Width, height and strap length are yours to set.
Materials for Your Crochet Mesh Bag
Short list. Nothing specialist.
| Item | What you need | Why it matters |
|---|---|---|
| Yarn | About 100 g (one skein), DK or worsted weight, acrylic or cotton | Heavier weight keeps its shape when loaded |
| Hook | Matched to your yarn — 4 mm, 4.5 mm or 5 mm | A 4.5 mm hook made the 9 in bag shown |
| Stitch markers | Two (bobby pins do the job) | One per curved end. They mark your increases and your join |
| Ribbon or contrast yarn | Two equal lengths, optional | For the bows on the straps |
Swipe the table sideways to see every column.
Cotton or Acrylic?
Both work, differently, once the bag is full.
- Cotton gives crisper stitch definition, barely stretches and holds a book without sagging. Pick it for structure.
- Acrylic is softer, cheaper and comes in more colours, but relaxes with wear. Less good for heavy loads.
The V-Stitch, Explained Properly
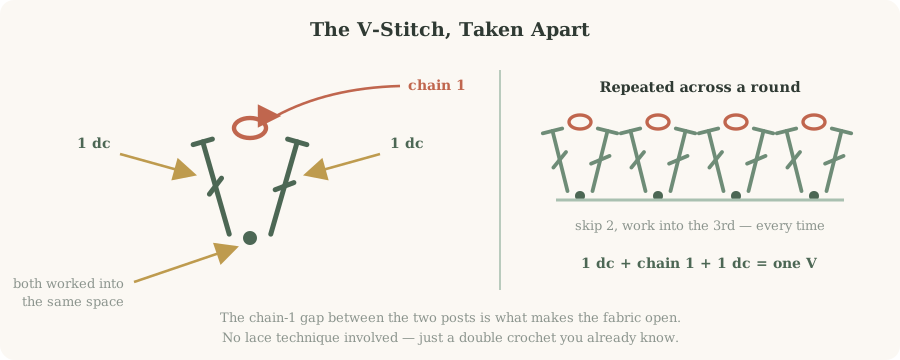
A V-stitch is one double crochet, chain one, one double crochet, all worked into the same stitch or space. The two posts splay around the chain into a V. Repeat it across a round with skipped stitches between, and you have mesh.
| Abbreviation | Stitch | Used for |
|---|---|---|
| ch | Chain | Foundation row and turning chains |
| dc | Double crochet (US) | The base and both legs of every V |
| sl st | Slip stitch | Closing rounds, joining the straps |
| V-st | V-stitch | dc, ch 1, dc in one space — the whole bag body |
Swipe the table sideways to see every column.
The One Detail That Trips People Up
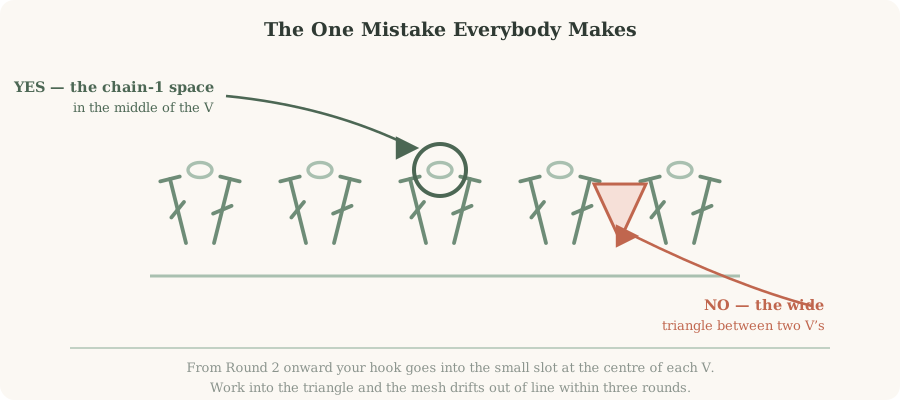
Work into the V, not the triangle
From the second round onward your hook goes into the chain-1 space at the centre of each V, the small slot. Not the wider triangle that opens between neighbouring V-stitches.
Work into the triangle and nothing looks wrong straight away. Three rounds later your columns have drifted and the mesh is crooked. Learn the difference once.
How Many Chains for Your Crochet Bag?
The foundation chain sets the width of the finished bag. It is the only decision you make before starting.
- Decide what has to fit. Lay the widest thing you plan to carry on the table and measure it.
- Add roughly an inch. Mesh stretches, but ease stops the bag looking strained when full.
- Chain to that measurement, slightly tight — the chain loosens as you work into it.
- Lay it flat and check against your object. Adding or pulling back a few chains now costs nothing.
| Bag width | Chains (DK / worsted, 4.5 mm hook) | Good for |
|---|---|---|
| 6 in · 15 cm | about 24 | Phone, keys, a small pouch |
| 9 in · 23 cm | 36 — the bag shown | Paperback, tablet, everyday carry |
| 12 in · 30 cm | about 48 | Market shop, beach bag |
| 14 in · 36 cm and up | 56 and up | Project bag, oversized tote |
Swipe the table sideways to see every column.
How to Crochet the Mesh Bag
Part 1 · The Oval Base
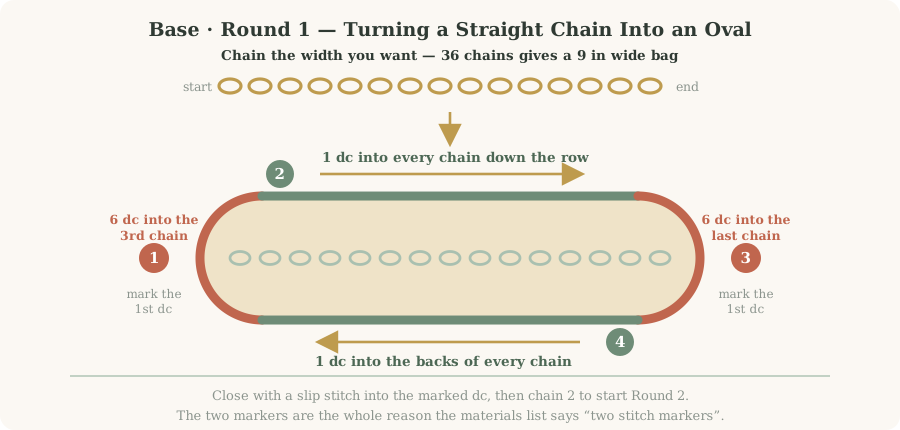
Round one turns a straight chain into a flat oval by fanning six double crochets around each end. Everything after depends on this lying flat.
- Chain your width. The bag shown used 36 chains.
- Work 6 dc into the 3rd chain from the hook. Mark the first of those six with a stitch marker.
- Work 1 dc into every chain down the row to the last chain.
- Work 6 dc into that last chain. Mark the first one — second marker used.
- Work 1 dc into the backs of every chain along the second side, back to the start.
- Slip stitch into the marked dc to close, then chain 2 for round two.
Round two widens the oval. All twelve increases land on the curved ends, six at each, and your markers already sit where you need them.
- Work 2 dc into the same stitch, six times across the first curved end.
- Work 1 dc into every stitch along the straight side to the next marker.
- Work 2 dc into the same stitch, six times across the second curved end.
- Work 1 dc into every stitch until the end of the round.
- Slip stitch into the marked dc to close.
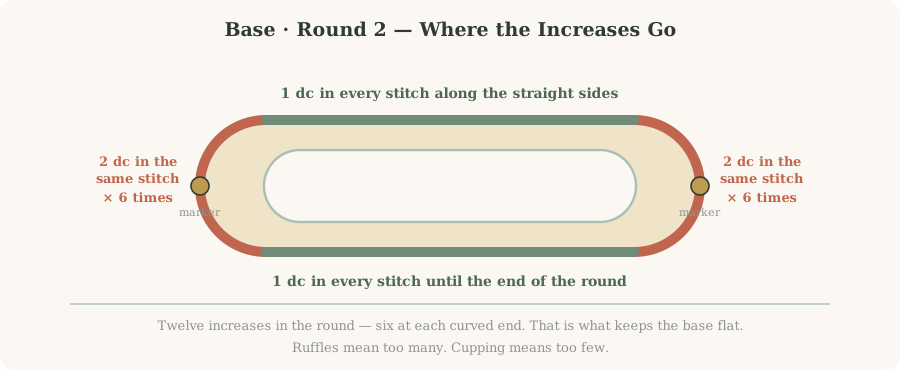
Lay the base down. It should sit flat, like a long lozenge. Ruffles mean too many increases. Cupping means too few, or a hook a size too small.
Part 2 · The Mesh Body
Here the project turns easy. Every round to the top is the same instruction.
- Chain 4. The first three count as a double crochet, the fourth as your chain 1.
- Work 1 dc into the same stitch. That is your first V-stitch made.
- Skip 2 stitches. Into the 3rd, work 1 dc, chain 1, 1 dc. Repeat all the way around.
- Slip stitch into the 3rd chain of your starting chain-4 to close the round.
- From the next round on, chain 4, 1 dc into that same space, then repeat “skip 2, into the 3rd V-space work 1 dc, chain 1, 1 dc” around.
How many rounds should you work?
Keep going until the bag is as deep as you want. Twelve rounds gave about six inches here.
| Rounds | Approximate depth | What it becomes |
|---|---|---|
| 8 | about 4 in | Small shoulder pouch |
| 12 | about 6 in — as shown | Everyday bag, fits a paperback |
| 16 | about 8 in | Deep tote |
| 20+ | 10 in and up | Market or beach bag |
Swipe the table sideways to see every column.
Part 3 · The Straps
Straps are worked in rows off the top edge. Four moves per row, every row after the first identical.
- Row 1: chain 4, 1 dc into the first space. Repeat “skip 2, in the 3rd space work 1 dc, chain 1, 1 dc” twice. Finish with 1 dc into the next chain-1 space.
- Every row after: chain 2 and turn your work.
- Work 1 dc into the first stitch.
- Repeat “skip 2, in the 3rd space: 1 dc, chain 1, 1 dc” twice.
- Work 1 dc into the last stitch to end the row.
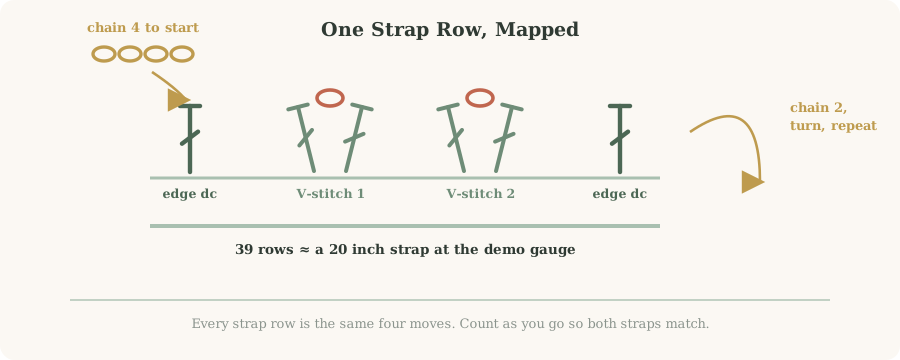
Repeat until the strap reaches the length you want. The one shown ran to 39 rows, about twenty inches. Count as you go — matching a second strap by eye is miserable.
| How you will wear it | Strap length, each | Rows at this gauge |
|---|---|---|
| Hand carry, short shoulder | 14–16 in | 28–32 |
| Over the shoulder — as shown | 20 in | 39 |
| Crossbody | 28–34 in | 55–66 |
Swipe the table sideways to see every column.
Attaching straps without a visible seam
- Mark where the free end will land on the opposite side of the bag.
- Turn the bag inside out before you join anything. This is the whole trick.
- Push your hook through the stitches of both strap and body, then slip stitch loosely to join.
- Chain 2 to finish and fasten off.
- Turn the bag right side out. The join is hidden inside.
Part 4 · The Bows
Woven ribbon
Optional, and the detail people ask about. Cut two long strands of ribbon or thick contrast yarn to the same length. Weave each one up and down through the holes along the middle of a strap, using your hook or your fingers. Tie a bow at each side.
Or crochet the bows instead
Ribbon frays and has to come off before washing. A crocheted bow does not, and it matches the yarn exactly. Stitch one to each strap join.
Troubleshooting and Ways to Make It Yours
Six problems account for almost every beginner question.
| What is happening | Why | Fix |
|---|---|---|
| Base ruffles, will not lie flat | Too many increases at the ends | Six dc in the end chain, six increases on round two |
| Base cups upward | Too few increases, or hook too small | Add one increase per end, or size up |
| Mesh is floppy | Yarn too light, or hook too large | Move to DK or worsted, drop to 4 mm |
| V-stitches drift out of line | Working the triangle gaps, not the chain-1 space | Check the Section 3 diagram, restart the round |
| Round join shows as a stripe | Normal for any joined round | Rotate that column to a side edge |
| Straps came out different lengths | Rows were not counted | Tally rows on paper as you work the first |
Swipe the table sideways to see every column.
Five Ways to Change the Pattern
- Line it. A hemmed cotton rectangle inside the top round stops small things falling through.
- Colour block the body. Change yarn at round six for a two tone bag, no new technique.
- Swap the bow for a drawstring. Weave a cord through the final round and the bag closes.
- Widen the straps. Three V-stitches per row instead of two makes a chunkier handle.
- Make a matching pouch. Eighteen chains, six rounds, leftover yarn gone.
How Long This Takes
Plan a weekend for your first one, an evening or two after that.
| Stage | First attempt | Once you know the stitch |
|---|---|---|
| Oval base | 45–60 min | 20 min |
| Mesh body, 12 rounds | 2–3 hrs | 90 min |
| Straps, both | 3 hrs | 2 hrs |
| Joining and bows | 30 min | 15 min |
Swipe the table sideways to see every column.
Looking After It
Remove the ribbons first. Acrylic takes a cool machine cycle in a pillowcase; cotton prefers a cool hand wash. Dry flat, reshaped by hand.
Frequently Asked Questions About the Crochet Mesh Bag
What is a V-stitch in crochet?
How many chains do I need for a crochet bag?
What yarn is best for a crochet mesh bag?
Can I make this crochet mesh bag bigger or smaller?
Why do my V-stitches look uneven at the end of each round?
Do I need to line a crochet mesh bag?
Is this pattern suitable for absolute beginners?
How do I attach the straps so the seam does not show?
Your Bag, Your Measurements
Go back to that paperback sitting at an angle. This time you measured it, chained to fit, and the bag closed around it properly. That is the point of making rather than buying.
Your first will have a slightly wobbly base and a join you can find if you look. Nobody else will look.
Your quick start checklist:
- One skein of DK or worsted, a 4.5 mm hook, two stitch markers
- Measure the widest thing you want to carry, add an inch, chain to that
- Round 1: 6 dc into the 3rd chain, dc along, 6 dc into the last, dc back
- Round 2: 2 dc in the same stitch six times at each curved end
- Body: chain 4, then skip 2 and work dc, ch 1, dc in every 3rd space
- Straps: two V-stitches per row, an edge dc each side, chain 2, turn
- Join the straps inside out, then weave the bows through
What size did yours come out?
Leave a comment with two numbers: your chain count and the width you measured.
Enough of those and this page gets a sizing chart built from real gauges, not one person’s tension.
3 Comments