How to Crochet a Mesh Cardigan: The Made-to-Measure Tutorial With Full Math
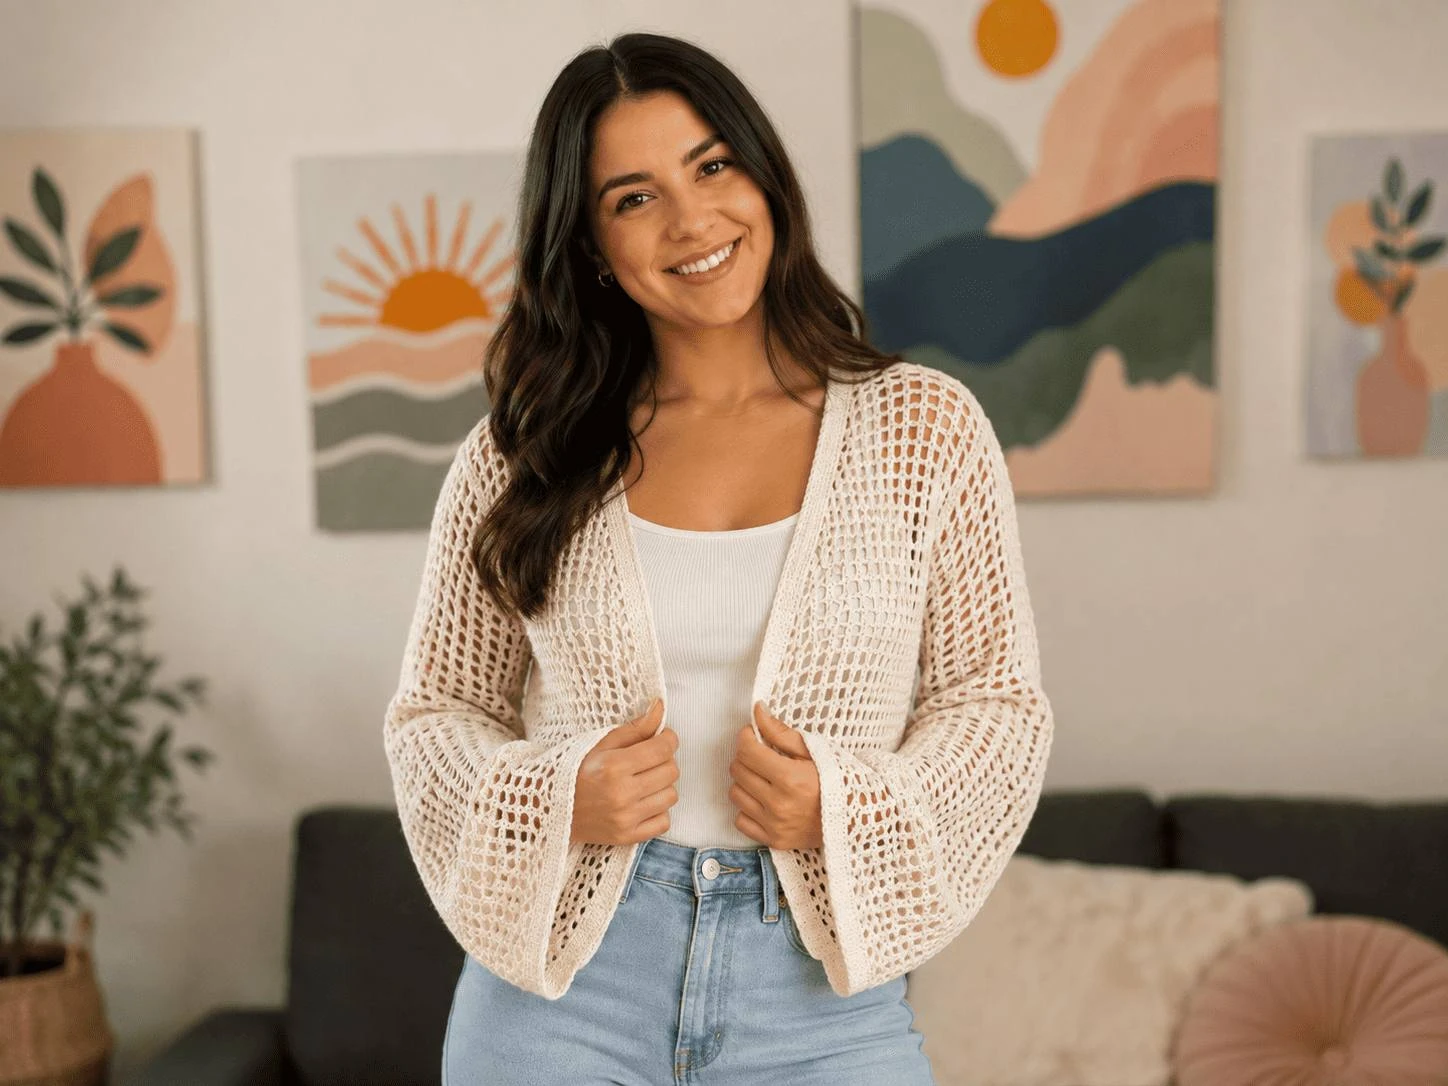
Picture the end of day two. Your arms slide into the sleeves, you thread a skinny cord through two little mesh holes, tie a bow at your chest — and it fits. Not “close enough for handmade” fits. Actually fits, the way a cardigan you bought fits, except this one has your numbers in every single row.
That is the whole promise of a made-to-measure crochet mesh cardigan. There is no guessing your size, no ripping back because the pattern assumed someone else’s shoulders. You take three measurements, you do two tiny bits of math, and the cardigan grows to your exact body out of nothing but chain stitches and single crochets.
One honest note before we start: this is not an absolute-first-hook project. But it is a two-stitch project — if you can chain and single crochet, every hard part here is arithmetic, not technique.
This guide walks the full build in order, with eight hand-drawn diagrams for the spots where photos never tell the truth: the construction map, the gauge math, and which edge gets the increases.
What You Are Making — And Who It Is For
The finished piece is an open-front, tie-closure mesh cardigan with long sleeves and a soft diagonal slope at the front edges. The fabric is an airy grid of chain-5 loops anchored by single crochets, which means it drapes, it breathes, and it layers over everything from slip dresses to plain tees. The bow tie is removable, so you can move it higher, lower, or skip it on a given day.
Because the pattern is made to measure, there is no size chart to obey. The example numbers running through this guide come from a size XS–S build using roughly 200–250 g of yarn, but your tape measure is the real pattern.
What This Tutorial Covers
- Three body measurements (A, B, C) that define every panel of the cardigan
- A gauge swatch that doubles as your mesh-stitch practice piece
- The two small calculations that size your back panel and your front slope
- The six-part construction order: back panel, shoulders, front panels, side seams, sleeves, tie
- Increase rows that shape the front slope without distorting the outer edge
- Sleeves worked in rounds straight off the armhole, plus finishing borders
Materials and Tools for a Crochet Mesh Cardigan
The entire cardigan is one yarn, one hook, and a handful of notions. The single decision that changes the look most is hook size: the mesh texture reads tight and defined with a small hook, and chunky and loose with a big one.
Your Complete Supplies Table
| Material or Tool | Recommended Spec | Notes |
|---|---|---|
| 🧶 Yarn | 200–300 g DK or medium-weight cotton or acrylic | 250 g of medium-weight acrylic covers a typical XS–S build; check the Craft Yarn Council weight system if your label is unclear |
| 🪝 Crochet Hook | 3 mm, 3.5 mm, or 4 mm | 3.5 mm matches the example numbers; avoid bigger hooks unless you want a deliberately chunky, open look |
| 📏 Soft Measuring Tape | Standard fabric tape | Used for body measurements and for counting stitches per 4 inches on the swatch |
| 📌 Stitch Markers | A few, or bobby pins | Essential for sleeve rounds and for marking the armhole gap |
| 🪡 Yarn Needle | Blunt tip | For weaving ends and for the sewn seam option on the side seams |
| ✂️ Scissors | Any sharp pair | You will cut several ends between sections |
Hook Size at a Glance
| Hook | Fabric Result | Best For |
|---|---|---|
| 3 mm | Fine, dense grid with a tidy drape | A more polished, less sheer cardigan |
| 3.5 mm | The sample gauge — open but structured | Most makers; matches the example numbers |
| 4 mm | Airier, faster, softer drape | Beachy layering pieces over swimwear |
Yarn Estimates by Size
| Size Target | Approx. Yarn | Reality Check |
|---|---|---|
| XS–S | 200–250 g | Comfortable for a hip-length cardigan with full sleeves |
| S–M | 250–300 g | The sample build with a 3.5 mm hook |
| M–L and up | 300–400 g | Buy one extra skein; longer sleeves eat yardage first |
Take Your Measurements and Read the Construction Map
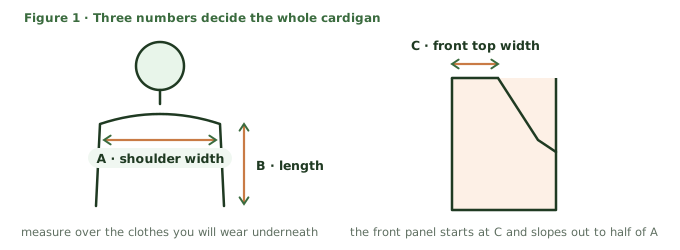
Everything downstream depends on three numbers written at the top of a notebook page. Measure over the clothes you would actually wear under the cardigan, and have a friend check the shoulder width if you can — it is awkward to measure alone.
The Three Measurements
- Measurement A — shoulder length: across your back, from the top of one shoulder corner to the other. This sets the width of the back panel.
- Measurement B — cardigan length: from the top of the shoulder down to your waist or hip, wherever you want the hem to land. This sets the length of both the back and front panels.
- Measurement C — front panel top width: the narrow width of the shoulder where the front panel begins. This sets the shoulder straps and the starting width of the front slope.
The Construction Order
The cardigan is six sections worked in a fixed order, and most of them flow directly out of the previous one without cutting yarn. Read this list twice before you start — half the confusion in garment crochet is simply not knowing which rectangle you are looking at.
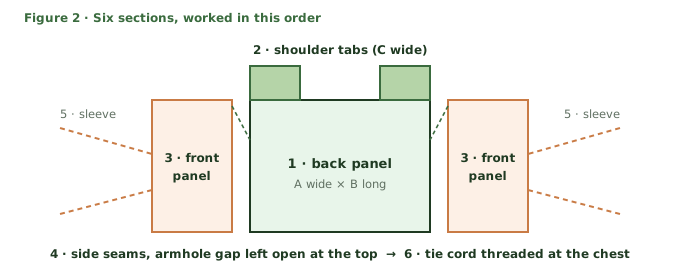
- Back panel: one rectangle, A wide and B long.
- Shoulder sections: two small tabs, C wide, worked straight off the top corners of the back panel.
- Front panels: two panels that start at C and slope wider, with increases, until they reach half of A, then run straight to length B.
- Side seams: front and back joined at the sides, leaving an armhole opening at the top.
- Sleeves: picked up around each armhole and worked in rounds to your wrist.
- Tie: one long crocheted cord threaded through the mesh and knotted into a bow.
The Gauge Swatch and the Mesh Stitch Itself
The swatch here is not a chore. It is where you learn the stitch, prove your hook choice, and collect the one number the back-panel math needs: mesh stitches per 4 inches. Skip it and every calculation that follows is a guess.
Building the Swatch
- Make a slip knot, then chain 2.
- Work foundation single crochets in multiples of 3 until the strip is around 6 inches long. Foundation sc keeps the bottom edge as stretchy as the mesh above it.
- Start the first mesh row: chain 6, turn, skip 2 stitches, single crochet into the 3rd stitch.
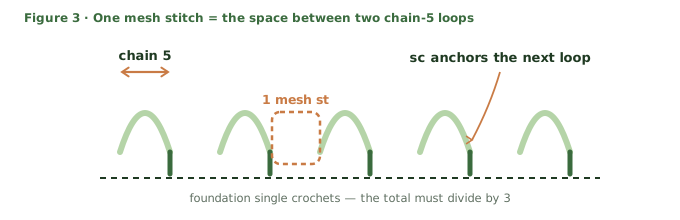
- Repeat chain 5, skip 2, sc into the 3rd stitch to the end. The space between two sets of 5 chains is one mesh stitch.
- Every later row: chain 6, turn, sc into the first mesh stitch, then repeat chain 5, sc into the next mesh stitch across.
- Crochet 6 or more rows, or until the piece is about 6 inches long, then fasten off and gently stretch it the way you would wear it.
Quick Self-Check
- Each chain-5 loop should sit over a skipped pair of stitches below, giving an even diamond grid.
- Count mesh stitches — the gaps, not the posts — at the end of every row while you are learning.
- Stretch the swatch lightly side to side. The grid should open evenly without one loop hogging the yarn.
Sizing the Back Panel: Two Minutes of Math
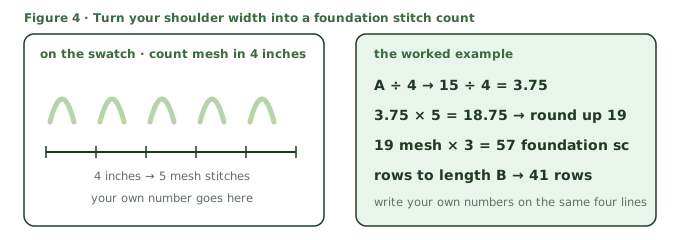
Here is the only arithmetic the whole cardigan demands. You are converting your shoulder width (A) into a count of mesh stitches, then into a count of foundation single crochets.
- Divide measurement A by 4. In the worked example A = 15 in, so 15 ÷ 4 = 3.75.
- Lay the tape over your swatch and count how many mesh stitches fit in 4 inches. In the example, 5.
- Multiply the two: 3.75 × 5 = 18.75. Round decimals up — 19. That is your mesh stitches per row.
- Multiply by 3 to get foundation single crochets: 19 × 3 = 57 FSC.
- Crochet mesh rows until the panel is as long as measurement B. The example back panel: 41 rows.
Crocheting the Back Panel
- Make a slip knot and work your calculated number of foundation single crochets — 57 in the example.
- Work mesh rows exactly as practiced in the swatch: chain 6, turn, sc into the first mesh stitch, then chain 5, sc into the next mesh stitch across.
- Keep going until the panel measures length B. Note your final row count — the front panels will borrow it later. Example: 41 rows, 19 mesh stitches per row.
The Shoulder Sections: Small Tabs, Big Payoff
Directly after the last row of the back panel — without cutting yarn on the first side — you turn the corner and work a narrow strip upward. This strip is the top of the shoulder, and it is only as wide as measurement C.
- At the end of the back panel’s last row, continue with mesh stitches but stop when the row is as wide as C. The example uses 6 mesh stitches per row.
- Chain 6, turn, and repeat mesh rows until the tab is about 3.5–4 inches long, roughly 8 to 10 rows. The example uses 9.
- Make sure the last row ends on the inside of the panel, so the next section flows from the correct edge.
- For the second shoulder, attach fresh yarn at the opposite top corner: slide it through a corner mesh stitch, secure with a double knot, then repeat the same rows.
The Front Panels: Shaping the Slope With Increases
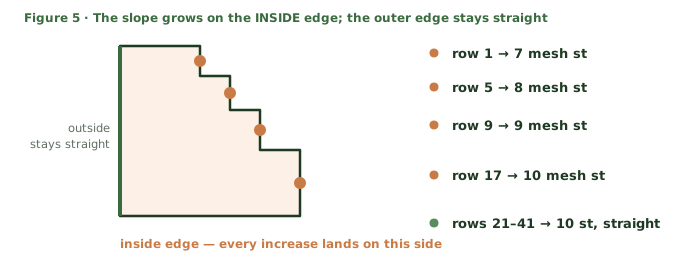
The front panels are what make this cardigan look designed instead of rectangular. Each one starts at the shoulder width — your 6-stitch tab — and widens with small increases until it reaches half the back panel’s width, creating that soft diagonal line down the chest. The math is gentle.
The Second Calculation
- Top-section rows: about half the back panel’s rows. Example: 41 ÷ 2 ≈ 20 rows.
- Target width: half the back panel’s mesh stitches, rounded to a friendly number. Example: 19 → 20 → half = 10 stitches.
- Increases needed: target minus shoulder width: 10 − 6 = 4 increases, spread across the 20 rows.
Placing those four increases on rows 1, 5, 9 and 17 yields the stitch ladder below. Use it as a template and space your own increases evenly if your numbers differ.
| Rows | Mesh Stitches at End of Row | What Happens |
|---|---|---|
| 1–4 | 7 | Increase on row 1 |
| 5–8 | 8 | Increase on row 5 |
| 9–16 | 9 | Increase on row 9 |
| 17–20 | 10 | Increase on row 17 |
| 21–41 | 10 | Straight — no more increases |
How to Work an Increase
An increase is one extra mesh stitch added at the start of a row: chain 6, turn, sc into the first stitch, then chain 5 and sc back into the SAME stitch. That double entry is the whole trick. All other rows are plain: chain 6, turn, sc into the first mesh stitch, chain 5, sc into the next mesh stitch across.
Finishing the Front Panel
After row 20 the slope is complete. From row 21 onward, crochet straight mesh rows with no increases until the front panel matches the back panel’s length — row 41 in the example. Then fasten off and repeat the entire shoulder-plus-front sequence on the other side.
Side Seams and the Armhole Gap
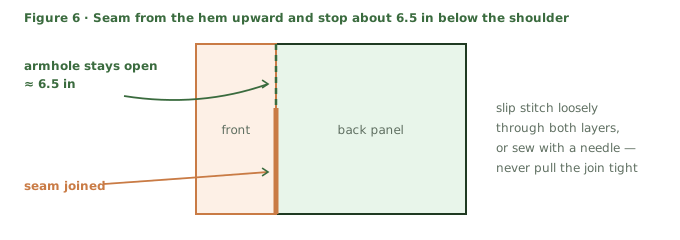
With both front panels done, fold each front onto the back so the side edges line up, wrong sides together if you prefer a neater seam line. Join from the bottom hem upward and stop about 6.5 inches below the shoulder. That open space is your armhole.
- Align the front and back edges stitch for stitch; pin or mark the point where the armhole begins.
- Join with slip stitches through both layers, working loosely, or sew with a yarn needle if you prefer a flatter seam.
- At the armhole mark, fasten off, knot securely and cut. Repeat on the other side.
Sleeves in Rounds, Straight Off the Armhole
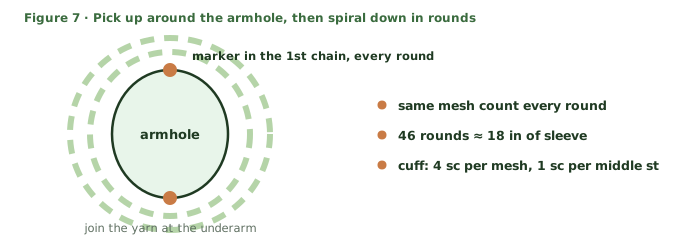
No separate tubes to sew in. The sleeve is picked up around the armhole opening and spirals down the arm in rounds of the same mesh stitch.
- Count the mesh stitches around your armhole — 17 in the example. Yours may differ; both sleeves must match each other, not the example.
- Attach yarn with a knot at the bottom of the armhole, the underarm point.
- Round 1: chain 5, sc into the first mesh stitch, place a marker in the first chain, then repeat chain 5, sc into the next mesh stitch all the way around.
- End the round with a slip stitch into the first chain. Start each new round by turning the work and slip stitching into the same mesh stitch, then continue the pattern, replacing the marker in your first chain every round.
- Keep the same stitch count every round — no increases, no decreases. Continue until the sleeve is your length. The example runs 46 rounds, about 18 inches.
- Border round: work 4 sc into each mesh stitch and 1 sc into each middle stitch all the way around for a neat cuff edge. Slip stitch into the first stitch, chain 1, fasten off.
Front Borders and the Bow Tie
The Front Edge Border
With the sleeves done, work a single crochet border down each front panel edge, from shoulder to hem. Work about 3 sc into each mesh stitch and 1 sc into each single crochet you meet, adjusting the count wherever the edge waves or cups. The goal is a flat, quiet line that frames the opening.
The Tie Cord
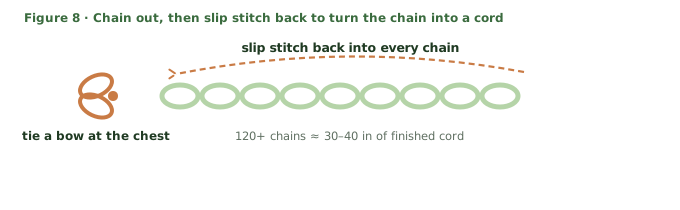
- Chain a long string: 120+ chains, roughly 30–40 inches.
- Turn, then slip stitch into every chain back down the line. This turns a floppy chain into a round, sturdy cord.
- Fasten off, cut, and weave the tail in.
- Thread the cord through any two mesh holes at the chest and tie a bow. Move it up or down whenever the mood changes — that is the whole point of mesh.
Blocking, Care, and the Final Try-On
Fresh off the hook, mesh fabric can look a little clenched. A pass with a garment steamer, or a soak in warm water and a flat dry, relaxes every stitch until the grid opens into that soft, even diamond texture. Block before you judge the fit — it genuinely changes the garment.
- Hand wash only, cool to warm water, gentle squeeze, never wring.
- Block with warm water or steam to loosen and even out the stitches.
- Weave ends along the single crochet posts for at least two inches before trimming.
- Store folded, not hung. Mesh on a hanger for months will stretch at the shoulders.
Troubleshooting at a Glance
| Symptom | Likely Cause | Fix |
|---|---|---|
| Row count drifts | Missed or added a mesh stitch | Count gaps every row; rip back to the last correct row |
| Slope on the wrong side | Increase worked at the outside edge | Check hook position before each increase row; redo the row |
| Seam puckers | Joined too tightly | Rip and rejoin loosely, or switch to the sewn method |
| Sleeve spirals or twists | Marker dropped, round start lost | Re-mark the first chain every single round |
| Fabric looks clenched | Normal pre-blocking tension | Steam or wet-block and watch the grid bloom open |
Your Numbers, One Page
| Variable | Worked Example | Yours |
|---|---|---|
| Mesh per row (back) | 19 | round up (A ÷ 4 × mesh per 4 in) |
| Foundation sc (back) | 57 | mesh per row × 3 |
| Back rows | 41 | to length B |
| Shoulder tab | 6 st × 9 rows | width C × 3.5–4 in |
| Front target and increase rows | 10 st, rows 1, 5, 9, 17 | half back st; spread evenly over half back rows |
| Sleeve | 17 st × 46 rounds | armhole count × your length |
| Tie | 120+ chains | 30–40 in |
Frequently Asked Questions About the Crochet Mesh Cardigan
Two Days of String, One Cardigan That Fits Only You
Here is the shape of the project once the math is done: a rectangle, two tabs, two slopes, two seams, two tubes and a cord. Every scary-sounding part is just the mesh stitch wearing a different hat. Your measurements do the designing; your hands only repeat.
Your build checklist:
- Measure A, B and C, and write them at the top of a notebook page
- Swatch 6 inches, count mesh per 4 inches, run the two calculations
- Crochet the back panel to length B and note the row count
- Work both shoulder tabs to width C, 8–10 rows each
- Shape the front slopes with inside-edge increases, then run straight to length B
- Seam the sides, leave the armhole, pick up sleeves in rounds, add cuffs
- Border the fronts, chain the tie, block it, tie the bow, wear it out
Ready to measure up?
Grab your tape, your 3.5 mm hook and a notebook. The math takes two minutes, the mesh takes over from there, and in a couple of days you will tie a bow on a cardigan that fits nobody else on earth quite like it fits you.