
Crochet Black Cat Plushie: The Cuddly Chenille Pattern
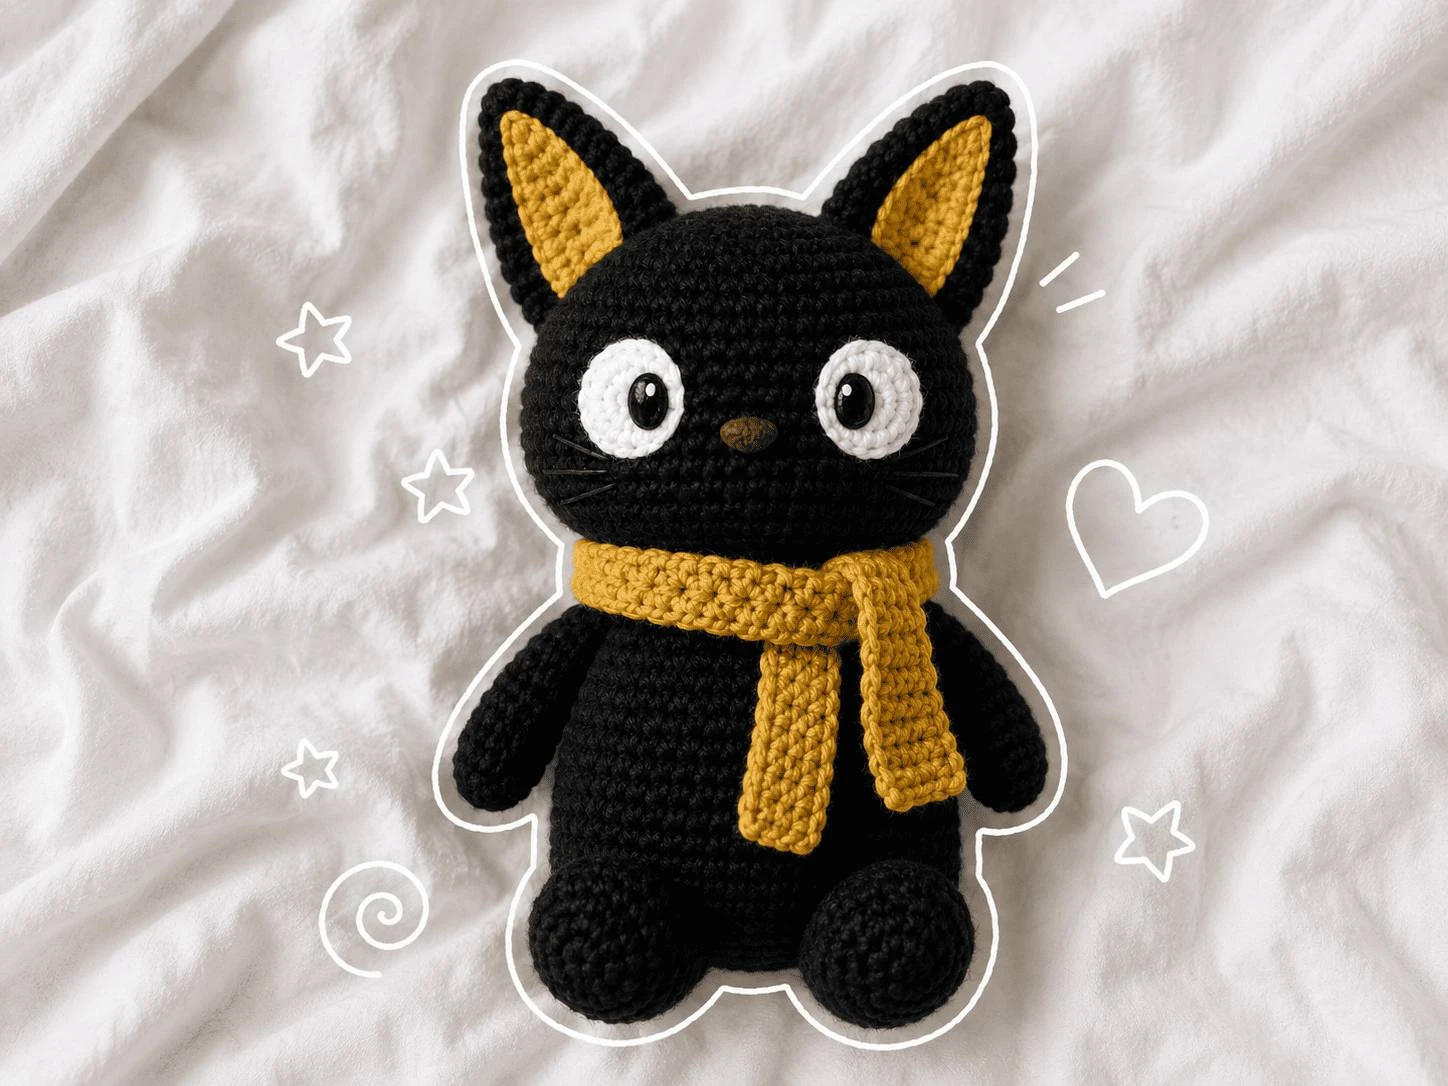
You have seen the photo. A small black cat with a fat round head, arms that flop, and a scarf knotted at the throat. It sits on someone else’s shelf and looks like it was always meant to be there.
The gap between that photo and your hook can feel wide. It is not. This cat is six shapes: two hands, two legs, one long tube that becomes body and head in a single piece, and two ears. Everything else is felt, glue, and about twenty minutes of pinning things on and taking them off again.
Chenille yarn does most of the visual work. It hides uneven tension, it hides the seams where the arms go in, and it turns an ordinary amigurumi into something people pick up without asking. In black it reads as velvet.
Set aside an evening. Keep a stitch marker in the first stitch of every round. That is the whole trick.
What You Are Making
A crochet black cat plushie is an amigurumi toy worked in continuous spiral rounds of single crochet, with the body and head made as one unbroken piece and the limbs crocheted straight into the body as you go. It stands about 30 cm tall in 4 mm chenille yarn and takes four to six hours.
Nothing here is worked flat except the scarf. There is no colour change, no sewing of a head onto a neck, and no shaping you cannot undo by pulling the yarn back out.
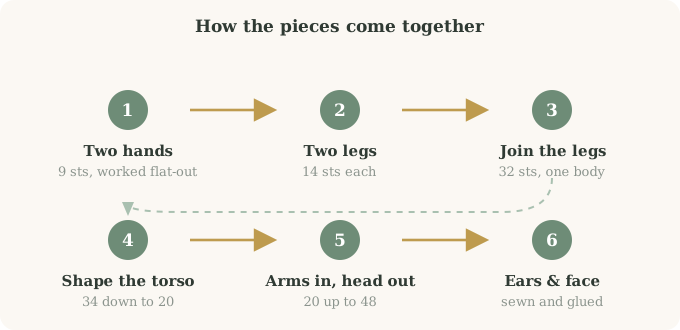
The anatomy of this cat
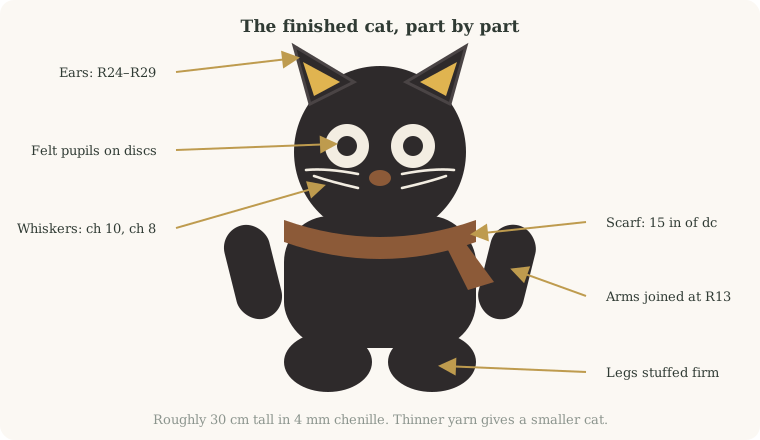
- Two hands — 9-stitch tubes, stuffed lightly so the arms hang instead of sticking out
- Two legs — 14-stitch tubes joined by a chain-2 bridge to make one 32-stitch body round
- Body and head — one continuous spiral, narrowing at the waist and flaring again for the head
- Two ears — small cones flattened and sewn between rounds 24 and 29
- The face — crocheted white discs, felt pupils, a felt nose and four chain whiskers
- The scarf — one row of double crochet, tied in a loose knot
Why this one suits a beginner
Most cat patterns ask you to make a head, make a body, and then sew the two together so the head sits straight. That seam is where beginner projects go wrong. Here the neck is just a narrow round in the middle of a tube, so the head cannot lean.
The arms are the same idea. Instead of sewing them on afterwards and hoping they match, you hook through the body and the flattened hand at the same time, and the round closes over the join.
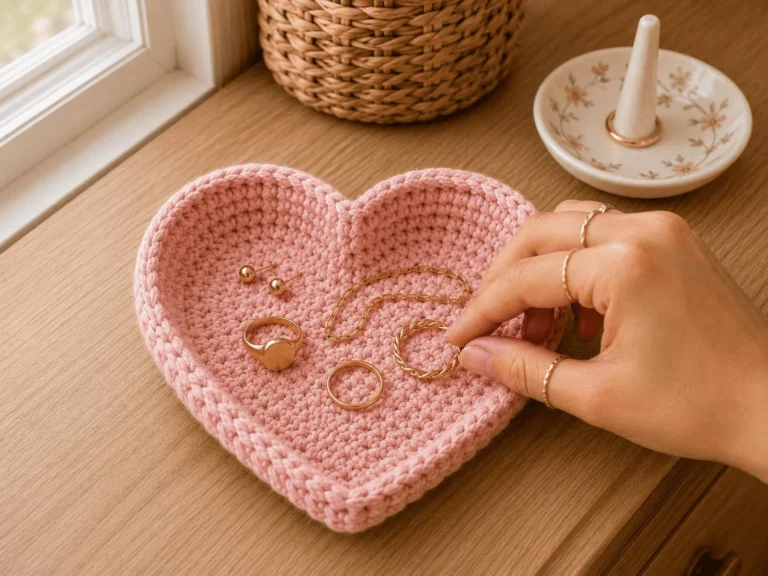
If you have made a small shaped piece like the heart trinket dish, you already have every stitch this needs.
What You Need Before You Start
Yarn thickness decides the size of your cat more than anything else. Everything else on this list is standard amigurumi kit.
| Item | What to use | Why it matters |
|---|---|---|
| Main yarn | Black chenille, roughly 4 mm thick, about 200 g | Gives the velvet surface and hides uneven stitches |
| Accent yarn | White cotton or acrylic, plus a little brown | White for the eye discs, brown for the scarf |
| Hooks | 4 mm for the body, 3 mm for the eyes | The smaller hook keeps the eye discs flat and dense |
| Felt | Black, brown and yellow scraps | Pupils, nose, and the triangles inside the ears |
| Stuffing | Polyester fibrefill, about 120 g | Firm in the head and legs, loose in the arms |
| Notions | Darning needle, stitch marker, fabric glue, scissors | A stitch marker is not optional in spiral rounds |
Swipe the table sideways to see every column.
Choosing the yarn
Chenille sold for baby blankets is usually close to 4 mm. If the label gives you a weight category instead of a thickness, you want bulky — category 5 on the Craft Yarn Council yarn weight system. Chunky velvet yarns marketed for arm knitting are too thick and will fight the 4 mm hook.
Cotton works too and is easier to unravel while you learn, but the finished cat will be noticeably smaller and the surface will show every stitch. Neither is wrong. They are different toys.
Abbreviations and the One New Technique
This pattern uses US crochet terms throughout. Keep this table open in another tab while you work through the rounds.
| Short | Means | Short | Means |
|---|---|---|---|
| ch | chain | dc | double crochet |
| mr | magic ring | hdc | half double crochet |
| st / sts | stitch / stitches | sl st | slip stitch |
| R | round or row | BLO | back loops only |
| sc | single crochet | FLO | front loops only |
| inc | increase — 2 sc in one stitch | × | repeat that many times |
| dec | decrease — 2 stitches worked together | [ ] | stitch count at the end of the round |
Swipe the table sideways to see every column.
The magic ring
Every piece in this pattern starts the same way. You wrap the yarn around two fingers, work all the stitches of round one into that loop, and then pull the tail to shut the hole completely. It is the difference between a closed paw and a paw with a gap in the middle.
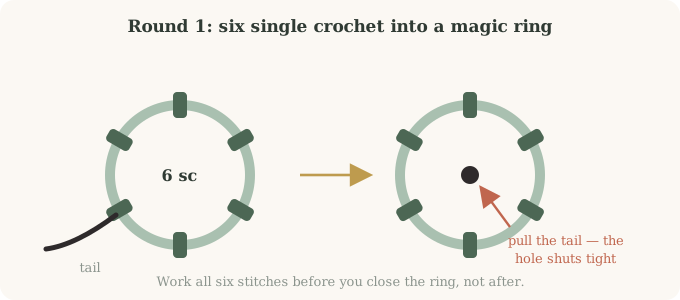
Work all six stitches first. Pull the tail second. If you tighten as you go, there is no room left for the last stitch and the ring twists.
Magic rings loosen over time in chenille. After you close one, give the tail a second firm pull and weave it through the ring a second time before you carry on.
Marking your rounds
Everything except the eye discs is worked in a continuous spiral — no slip stitch, no chain, no seam. That means there is nothing to tell you where a round ends. Slide a marker into the first stitch of each round and move it up as you pass it. In black chenille you will not find your place again without one.
How Big Yours Will Be
Every crochet black cat plushie uses the same stitch counts. The yarn is what changes the finished size. Work a quick check before you commit to 200 g of anything.
- Make one leg. Rounds 1 to 4 take about ten minutes.
- Lay it flat and measure across. A 14-stitch round in 4 mm chenille sits at roughly 5.5 cm wide.
- Multiply by five and a half. That is roughly your finished height, ears included.
- Adjust before you go further. Too small, go up a hook size or hold a second strand alongside. Too big, drop to 3.5 mm.
| Yarn | Hook | Finished height | Feels like |
|---|---|---|---|
| 4 mm chenille | 4 mm | 28–32 cm | A proper cuddle-sized toy |
| Bulky acrylic | 4.5 mm | 24–27 cm | Firmer, holds its shape better |
| Worsted / aran | 3.5 mm | 18–21 cm | Shelf-sized, keeps more detail |
| DK cotton | 3 mm | 14–16 cm | Pocket cat, fiddly to stuff |
Swipe the table sideways to see every column.
Step-by-Step Instructions
Part 1 · The hands (make 2)
Black chenille, 4 mm hook. These are small tubes that get flattened and crocheted into the body later, so the top edge stays open and flat rather than gathered.
- R1: 6 sc in a magic ring. Pull the tail closed. [6]
- R2: (1 sc, inc) ×3 [9]
- R3 to R8: 1 sc in each st around, six rounds. [9]
- Stuff lightly. Push in a pinch of fibrefill with the blunt end of your hook — enough to round the paw, not enough to firm it up.
- Flatten the opening so four stitches line up against four stitches, with the spare stitch at the fold.
- Work 4 sc across through both layers to seal the top. Fasten off and weave in the end. [4 along the flat edge]
Part 2 · The legs and the join
Two identical tubes, joined into one round. This is the only genuinely fiddly moment in the pattern, and it lasts about five minutes.
- R1: 7 sc in a magic ring. [7]
- R2: inc in every st. [14]
- R3 to R4: 1 sc in each st around, two rounds. [14]
- Leg 1: fasten off, leaving a short tail. Set it aside.
- Leg 2: do not fasten off. Keep the loop live on your hook.
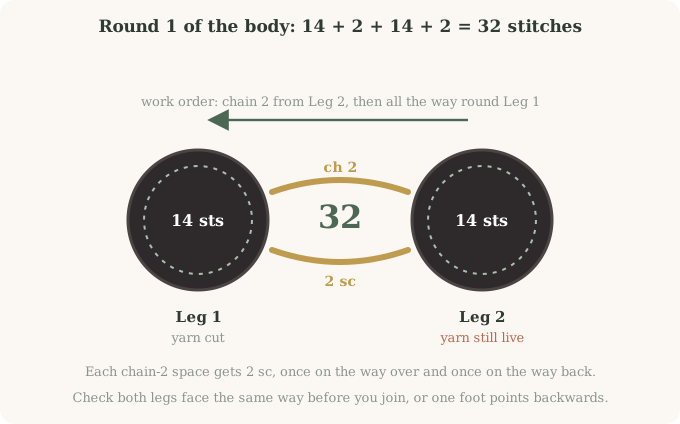
- Body R1, part one: from the live loop on Leg 2, ch 2.
- Part two: insert your hook into any stitch of Leg 1 and work 14 sc all the way around it.
- Part three: work 2 sc into the chain-2 space. This is the front of the crotch.
- Part four: work 14 sc around Leg 2.
- Part five: work 2 sc into the far side of the same chain-2. The round closes. [32]
Part 3 · Shaping the torso
Now you are working one continuous spiral. Rounds 2 to 8 build height, and rounds 9 to 12 pull the waist in so the head has something to sit on.
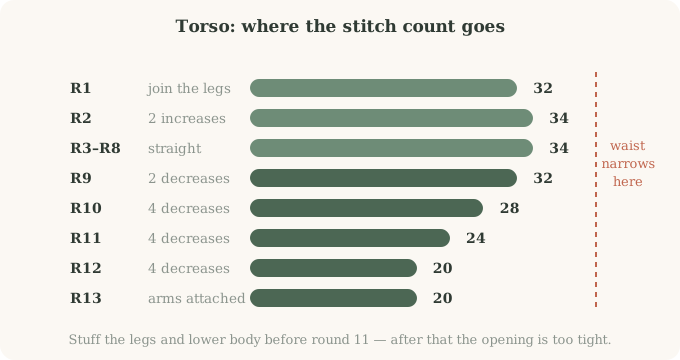
- R2: (15 sc, inc) ×2 [34]
- R3 to R8: 1 sc in each st around, six rounds. [34]
- R9: (15 sc, dec) ×2 [32]
- R10: (6 sc, dec) ×4 [28]
- R11: (5 sc, dec) ×4 [24]
- R12: (4 sc, dec) ×4 [20]
Part 4 · Attaching the arms
Round 13 is where it stops being a tube and starts being a cat. You crochet through the body and the flattened hand at the same time, so there is no seam to sew afterwards.
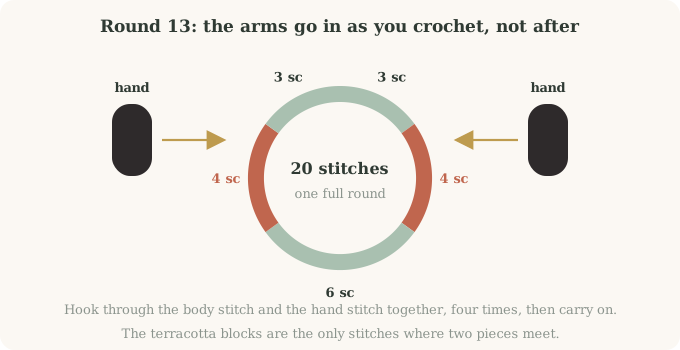
- R13, stitches 1 to 3: 3 sc into the body as normal.
- Stitches 4 to 7: hold the first hand against the body, flat edge lined up with the round. Push the hook through a body stitch and a hand stitch together, yarn over, pull through both, finish the sc. Repeat four times.
- Stitches 8 to 13: 6 sc into the body.
- Stitches 14 to 17: attach the second hand the same way, 4 sc through both layers.
- Stitches 18 to 20: 3 sc into the body. The round is closed. [20]
Part 5 · The head
From a 20-stitch neck to a 48-stitch head in two rounds. It flares fast and it looks wrong for about a minute, then it looks like a head.
- R14: inc in every st. [40]
- R15: (4 sc, inc) ×8 [48]
- R16 to R25: 1 sc in each st around, ten rounds. [48]
- R26: (6 sc, dec) ×6 [42]
- R27: (5 sc, dec) ×6 [36]
- R28: (4 sc, dec) ×6 [30]
- R29: (3 sc, dec) ×6 [24]
- R30: (2 sc, dec) ×6 [18]
- R31: (1 sc, dec) ×6 [12]
- R32: dec ×6 [6]
- Close: cut the yarn leaving 20 cm. Thread it on a darning needle, run it through the front loop of each of the last 6 stitches, pull tight, and bury the tail deep inside the head.
Part 6 · The ears (make 2)
- R1: 6 sc in a magic ring. [6]
- R2: inc ×6 [12]
- R3: 1 sc in each st around. [12]
- R4: (2 sc, inc) ×4 [16]
- R5 to R6: 1 sc in each st around, two rounds. [16]
- Close: do not stuff. Flatten the opening and work 8 sc across through both layers. Fasten off leaving a 30 cm tail for sewing. [8]
Part 7 · The face
Make the eye discs in white cotton or acrylic with the 3 mm hook. These are the only pieces worked in joined rounds rather than a spiral, which keeps them flat.
- R1: 7 sc in a magic ring, sl st to the first sc. [7]
- R2: ch 1, inc ×7, sl st to join. [14]
- R3: ch 1, (1 sc, inc) ×7, sl st to join. Fasten off and weave in the ends at the back. [21]
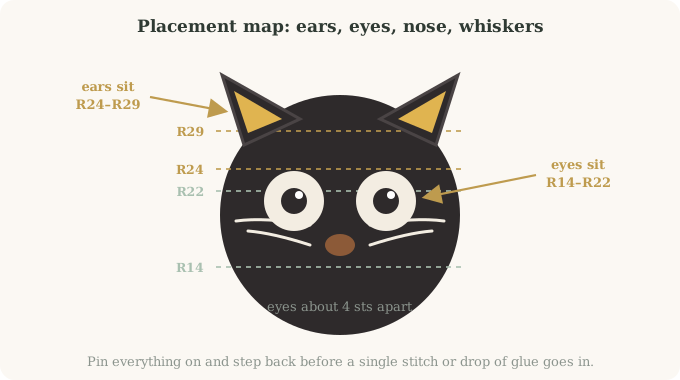
- Ears: pin them across rounds 24 to 29, roughly a third of the way in from each side. Sew all the way round the flattened edge with the long tail.
- Inner ears: cut two small triangles of yellow felt and glue one inside each ear.
- Eyes: glue the white discs between rounds 14 and 22, about four stitches apart. Let the glue set before the next step.
- Pupils: cut two black felt circles, roughly a third of the disc width, and glue them slightly high and slightly inward. That off-centre placement is what makes the face read as friendly.
- Nose: a small brown felt oval, centred just below the eyes.
- Whiskers: with black yarn and the 4 mm hook, hook into the face beside the eye and chain 10. Cut, pull the end through, knot. Repeat on the other side, then add a lower pair with chains of 8.
Part 8 · The scarf
- Chain in brown yarn until the chain measures about 38 cm, then add 2 more.
- Row 1: 1 dc in the third ch from the hook, then 1 dc in each ch to the end.
- Fasten off and weave in both ends.
- Tie it in a loose single knot at the throat, and pull the knot slightly to one side.
Troubleshooting, Variations and Care
When your crochet black cat plushie looks wrong
| What you are seeing | What caused it | What to do |
|---|---|---|
| Legs splay and the cat topples | Legs under-stuffed | Unpick to round 10, pack the legs properly, rework |
| Head leans to one side | Uneven stuffing at the neck | Push fibrefill into the low side through the top opening |
| Gaps between stitches | Tension too loose for chenille | Drop half a hook size and start again — chenille will not tighten later |
| Loops popping out of the surface | Chenille worming | Tug the two neighbouring stitches, never the loop itself |
| Arms stick out sideways | Hands stuffed too firm | Pull some fibrefill back out through the flattened edge |
| Head came out too big | Loose tension on rounds 16–25 | Stuff it less and let it sit into the neck a little |
| Lost your place in the spiral | No stitch marker | Count from the last increase round and re-mark |
Swipe the table sideways to see every column.
Ways to change it
- A grey cat — same pattern, grey chenille, and green felt behind the pupils
- A sleepy cat — skip the white discs and embroider two curved closed eyes in cream yarn instead
- A keyring cat — work every piece in DK cotton on a 2.5 mm hook and thread a split ring through the top of the head
- A longer tail — chain 20, work 19 sc back along the chain, and sew it to the lower back
- A matching set — the same construction in cream with brown ears makes a convincing bear
How long each part takes
| Part | Rounds | Roughly |
|---|---|---|
| Two hands | R1–R8 each | 40 minutes |
| Two legs and the join | R1–R4 each, then body R1 | 45 minutes |
| Torso and arms | R2–R13 | 1 hour |
| Head | R14–R32 | 1 hour 30 |
| Ears and eyes | short pieces | 30 minutes |
| Face, scarf and finishing | — | 45 minutes |
Swipe the table sideways to see every column.
Looking after it
| Situation | What to do |
|---|---|
| Everyday dust | Lint roller, or a soft brush along the pile |
| A mark or spill | Spot clean with cool water and a drop of wool wash, then air dry |
| A full wash | Hand wash cold inside a pillowcase. Never a machine — the felt pieces will lift |
| Flattened pile | Steam from a distance, then brush the nap back up with a soft toothbrush |
| A child under three | Embroider the face instead of using felt and glue |
Swipe the table sideways to see every column.
Crochet Black Cat Plushie FAQ
One Evening, One Cat
Your crochet black cat plushie is now a thing on your own shelf, and it has whatever small crookedness your hands gave it. That is the part shop-bought toys never have.
The skills underneath it — magic ring, increase, decrease, joining pieces as you work rather than sewing them on afterwards — are the whole foundation of amigurumi. Every animal you make after this one is a variation on the shapes you just finished.
Before you call it done
- Tug each arm and leg firmly — they should not shift
- Check every tail is buried inside, not tucked under a stitch
- Squeeze the head and add more stuffing if it dimples
- Look at the face from across the room and adjust the pupils if it looks blank
- Knot the scarf slightly off-centre — dead centre always looks stiff
Made one? Make the set.
The same shapes in cream make a bear, and in grey a rabbit with longer ears.
5 Comments